
User:Ohjian/Final presentation: Difference between revisions
| Line 408: | Line 408: | ||
===[ PCB assembly & setup ]=== | ===[ PCB assembly & setup ]=== | ||
<br> | |||
[[File:modular_matter_pcb_assembly1.jpg|400px]] | [[File:modular_matter_pcb_assembly1.jpg|400px]] | ||
[[File:modular_matter_pcb_assembly2.jpg|400px]] | [[File:modular_matter_pcb_assembly2.jpg|400px]] | ||
[[File:modular_matter_pcb_assembly3.jpg|400px]] | [[File:modular_matter_pcb_assembly3.jpg|400px]] | ||
[[File:modular_matter_pcb_assembly4.jpg|400px]] | [[File:modular_matter_pcb_assembly4.jpg|400px]] | ||
<br><br> | |||
===[ final modules ]=== | ===[ final modules ]=== | ||
Revision as of 14:07, 14 June 2023
MODULAR MATTER – REWIRE YOUR PRINTS!
[ Graduation project by ohjian - Jian Haake ]
previous practice, projects & prototypes
During my first year at XPUB I have been working on several projects and experiments that are linked or in some way related to my graduation project.
[ Workshop: The Screenless Office ]
In a workshop Brendan Howell introduced his project The Screenless Office. Collectively we developed a new function that was added to his Office: An operation that would use two texts as inputs, weave them together following a specific pattern and send it to the printer. Supi and I built a (screenless) physical interface with which the user could customize the pattern for the weaving function. We decided to use patchable cables as a physical representation of the weaving operation.

[ Analog Sound Synthesizers ]
A) Simple setup on a breadboard
This is the first analog synth I built. It consists of four variable oscillators that create different sounds and can be merged by two mixers. The setup also includes a DIY oscilloscope that uses an Arduino and an LCD display.


B) Patchable / modular setup on a permanent breadboard
This is my first attempt of a patchable / modular synth. Two of the six oscillators can be connected to a mixer using patch cables.

[ Free Circuits ]
I experimented with some free circuit designs that would involve a simple interaction with the user to light an LED. My main interest was: How does the user experience change when you have to …
a) push a button
b) touch two points with your fingers and make your body part of the circuit
… to light the LED?


[ Book Generator ]
In the beginning of my XPUB studies I wrote a python function called Book Generator, which was based on the House of Dust by Alison Knowles. The function would run on a Raspberry Pi connected to a physical push button and a receipt printer. Every time the button was pushed, a new definition for the book would be printed. The Book Generator works as a research tool for anyone interested in reading, thinking and making (with) books.

[ more insights, XPUB1 ]
Looking back, trying to connect the dots


sketching first ideas


project proposal
[ intro ]
The basic idea for MODULAR MATTER is simple: It uses the well-known concept of Modular Synthesis, but instead of staying in the original context of sound, the operating modes are translated and applied to the realm of print publishing.
Modular Synthesis
A modular synthesizer is an electronic instrument that generates electronic sounds. It consists of many different and independent physical modules that can be combined in any number of ways to create and manipulate sound output.
Each module performs a certain operation that can be controlled by adjustable components like switches, sliders and patch cables. The output of one module can be used as the input for another module, which allows for creative combinations, loops and unexpected outcome.

(Suzanne Channi and the Serge Modular Synthesizer)

(Erbe-Verb module by Make Noise, Illustrated Manual)
In order to apply this tangible and modular way of sound production to print publishing, it is important to understand how printed matter is usually created.
For my graduation project I want to use the well-known concept of Modular Synthesis. Instead of working with sound, I want to translate the idea to the realm of print publishing. More precisely, I want to create physical modules that perform operations on text and images to create printed outcome.
Desktop Publishing (DTP)
Since the expansion of the personal computer, most graphic designers are used to Desktop Publishing,
a technology that is based on a combination of hardware and software components to create printable outcome.
The whole operation involves 1) input devices, such as keyboard, camera and scanner, 2) control devices such as mouse and keyboard and 3) output devices such as a printer. It also relies on a Graphical User Interface (GUI) and WYSIWYG (what you see is what you get) software. For many graphic designers these tools and processes seem so natural, that it is hard to even imagine a different setup or workflow.
Re-thinking Desktop Publishing through the concept of Modular Synthesis
MODULAR MATTER is an attempt to re-think this print design workflow. Its experimental and modular setup offers an unconventional approach to perform operations on text and images in order to create printed matter. Inspired by the structure of Modular Synthesis, the process of Desktop Publishing is re-imagined as a number of independent and combinable hardware modules. Each module is performing a specific operation and can be regulated by an operation-specific, physical interface.
Different module types can be connected in order to create and transform typographical and pictorial material: 1) Input modules that generate text or images and 2) several transform modules that process and manipulate the input, are connected to 3) the output module, a printer, that produces the final outcome of the workflow. This setup is accompanied by 4) a preview module for accurate representation of the process.
Audience
The project addresses graphic designers and other creatives who are used to work with traditional Desktop Publishing software and tools. By introducing my physical modules as an alternative approach I am hoping to break open those habits and make them reflect on the tools they are familiar with. Since the modules produce printed outcome on A4 paper they can be used to create small posters, flyers and even simple publications.
[ why? ]
As a trained graphic designer, mainly concerned with printed matter and book making, I have been familiar with Desktop Publishing for more than ten years. The big player Adobe has been very present in all my making, designing and publishing processes and I never really reflected on the influence it might have on my practice. XPUB introduced me to the idea and benefits of alternative tools and software and I started to look at Desktop Publishing software from a more critical angle.
Parallel to that I was introduced to physical computing and started to experiment with microcontrollers and analog electronic circuits. I became interested in modular synthesizers and started to build a few small prototypes. Even though sound has never been part of my creative making practice, I was clearly fascinated by the concept behind it.
In my graduation project I want to bring together these two interests by using the concept of Modular Synthesis and translating it to the context of print publishing. By creating my own modules I want to suggest alternative physical interfaces and create a different experience of human-machine-interaction.
In “Software Takes Command” Lev Manovich reflects on the impact that interfaces and tools have on contemporary aesthetics, visual languages and graphic design. As creatives we are so used to seemingly flawless devices that experimental or clunky modules may help to slow down the process and produce unexpected outcome. This new perspective could help to reveal, reflect and evaluate what is normally concealed:
- How (and to what extent) tools shape our practice.
- What impact tools have on our imagination and independence as creatives.
- How our practice changes when we create our own tools.
technical infrastructure
In the beginning stages of the project, the biggest challenge is to come up with a technical infrastructure. I want to make sure to create a system that works for both text and images. To enable the modular approach I have to research and test different languages, formats and hardware components that allow connection and communication between the modules.
[ first sketches ]


[ flowcharts ]
How to create a modular system for both hardware and software?
- independent modules that read values from a physical interface -> microcontrollers?
- output module(s) that generate a printable file and connect to a printer and preview screen -> Raspberry Pi?


breadboard prototypes
First simple prototypes, experiments and test runs to establish a modular system.


reading & writing
[ thesis format: A Situated and Annotated Manual ]
Why a Manual?
A manual is a common format to give detailed and technical information and instructions with a hands-on approach. This format allows for complete and in-depth explanations on how MODULAR MATTER works and how to use it.
Why Annotated?
Technical descriptions often come with the risk of inaccessibility and could make the tool less approachable for some readers. To prevent this from happening and to subvert the strictness of the technical manual, a more intimate and playful layer will be added in the form of annotations.
Why Situated?
Another important aspect to be present in the manual is the context around the tool. The idea and implemen-
tation of the project are strongly influenced by personal experience and a background in graphic design and Desktop Publishing. Furthermore, the making process speaks to the practical and theoretical discourse around tools and how they shape practice. This situates the tool in a specific field that is relatable for many other creators and makers. Writing about the context, addressing references and relationalities, will help to explain the purpose and relevance of MODULAR MATTER.
[ thesis excerpts – MODULAR MATTER – Rewire your prints! ]
> The Context around the Tool
- Graphic Design and Book Making
- Proprietary Tools and their Implications
- Tools shape Practice
- How Proprietary Tools shape Graphic Design and Printed Matter
Graphic designers throughout large companies, creative studios, institutions and academia use tools that are designed to vanish, to disappear, to hide in plain sight. A compilation of commercial hardware and software maintain a familiar and seamless work environment that doesn’t require technical knowledge beyond the user interface or any further understanding of the processes at work. Everyone knows how to use the tools, and no one understands how they operate. This dependency on proprietary tools is not problematized enough in the creative field and can expedite instrumentalization and a lack of agency.
The users feel confident, nonchalantly switching from one application to the other, comforted by the fact that they know how to behave in this ever so familiar environment. While feeling very much at home in their proprietary toolkit, many graphic designers tend to underestimate the implicit effects that the economical conditions and ethical issues have on their creative independence and practice as a whole. [...]
The lack of diversity in tools causes a universalization of aesthetics, and even worse, it impacts the perception, experience and imagination of creatives as well. The possibilities of the tool are what is considered possible, and the tool’s limitations define the boundaries of what can be envisioned.
With these conditions and implications in mind, the need to establish a more independent design practice becomes apparent. When tools shape practice, the follow-up question is: How can practice shape tools? [...]
> Counter Strategies: Practice shapes Tools
- Hacking and Bending
- Alternative Tools
- Make your own Tools
Both the impact of tools on our practice as well as the impact of practice on our tools become apparent in the actual making. The suggested strategies of Hacking and Bending, Alternative Tools and Make you own Tools all require active engagement that goes beyond a critical understanding and awareness. In combination with acts of care and maintenance they may help to increase agency over the toolkit. Finding new ways to interrupt engrained habits of graphic designers is a gesture towards a more critical practice. A practice that is not only being shaped by proprietary tools, but instead one that re-evaluates and actively shapes graphic design tools and how they are being used.
These findings and realizations play an integral part in the idea, concept and development of MODULAR MATTER. They may be read both as guidelines for the process of making the tool as well as a philosophy on how to utilize it later on. [...]
> MODULAR MATTER
- technical handbook
patch example and updated flowchart


tryouts PCB (printed circuit boards)
How to get away from the breadboard? Building my first printed circuit boards (PCB) to understand how they work / how to build them.
- A simple 1-layer touch circuit built with Fritzing and CNC mill
- A simple module built with KiCad and produced by a manufacturer


test prints & previews
First experiments with postscript syntax to generate / write printable files


midwives gift kit
Selected items for my midwives support group to give insight into the project and process. The letter reads:
Dear fellows,
I hope this small kit finds you well, despite the piling workload and lack of leisure time.
In this kit you will find some technical schematics, which try to document and visualize the tool I am working on. The material stems from a chapter in my thesis that functions as a technical manual for my tool. To help you imagine the hardware modules, you will find a few physical components that I am using a lot. The small prints in the kit are first test layouts, made with my modules.
When we meet, I would like to walk you through the material and invite you to annotate the schematics. In my thesis, I am implementing an annotation and it would be nice to find some inspiration for that.
Yours,
Jian
(+ notes I received from Kamo as contribution to my process)


In a workshop with Holunder Heiß and Joseph Knierzinger I created a drawing machine by hacking a robotic vacuum cleaner. A marker is attached to the robot and the movement can be control via a remote control. I was invited to present the project in an interactive session at Extrapool, Nijmegen. The audience, amongst them many visual artists, illustrators and graphic designers, was using two drawing machines to draw onto riso printed posters on the floor. By being confronted with this clumsy and unfamiliar tool (as opposed to holding a marker in their own hands) they experienced unexpected moments, happy accidents and little failures, wondering how those have the potential to stimulate and inspire creative processes and outcome.


modules
[ software ]
latest version of the code:
MODULAR_MATTER
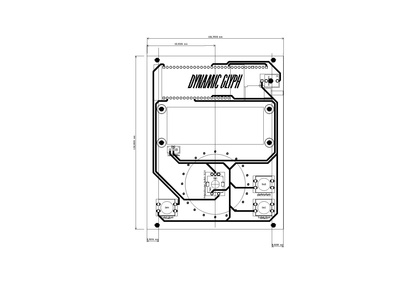
DYNAMIC GLYPH (input module, C++ on ESP32)
- read values from analog and digital inputs
- send values to the next module
FRICTION LABEL, WEAVER, FUTURE RELICS, WHOOSH (transform modules, C++ on ESP32)
- receive values from previous modules
- read values from analog and digital inputs
- add new values to the values received from previous module
- send values to the next module
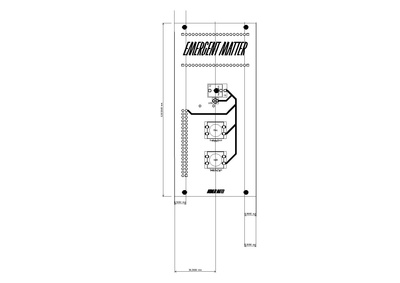
EMERGENT MATTER (python and postscript on Raspberry Pi Zero)
- receive values from previous modules
- read values from digital inputs (print / preview button)
- assign received values to all module-specific operations
- use outcome of each modules operation to generate one final postscript file
- send postscript file to printer / preview screen
[ electronic components ]
Test, understand and select electronic components for my physical interface


[ first sketches ]
Sketching different transform module, trying to come up with physical interfaces that to some degree resemble the (computational) operation that is running in the software


[ drafts for final modules ]
- DYNAMIC GLYPH (text input module as an alternative to a standard keyboard)
- FRICTION LABEL (uses text input to generate a label or sticker, distorted by glitch effects)
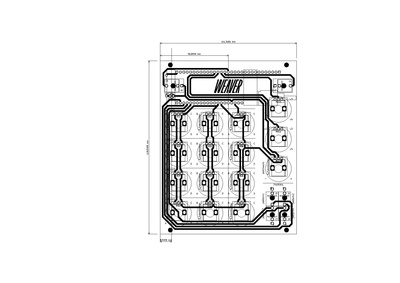
- WEAVER (uses a large number of rotating knobs and patch cables to create a pattern / patchwork)
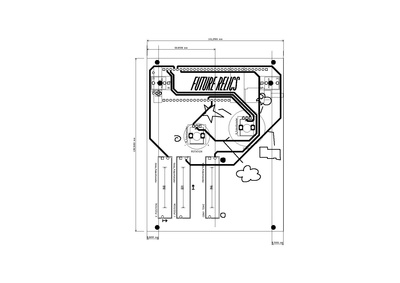
- FUTURE RELICS (generates a graphical shapes)
- WHOOSH (uses text input and creates a poetic layout using white spaces and repetition)
- EMERGENT MATTER (output module that generates a postscript file that is sent to the printer or preview screen)


[ electronic circuits ]
Drawing the electronic circuits for all 6 modules that are necessary to create the printed circuit boards


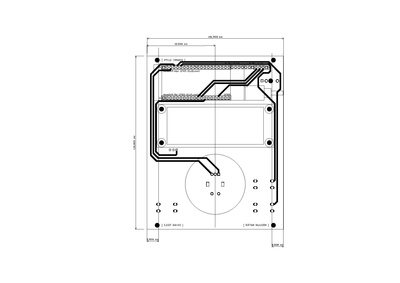
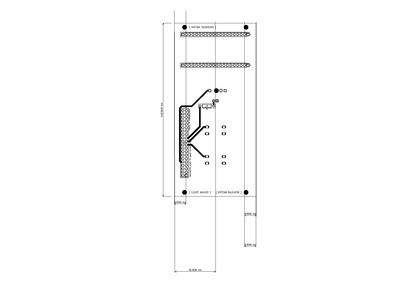
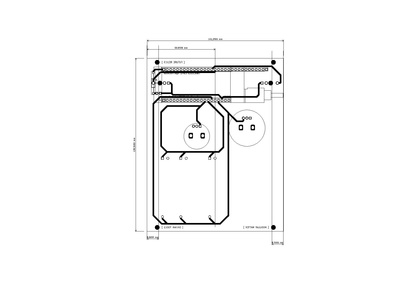
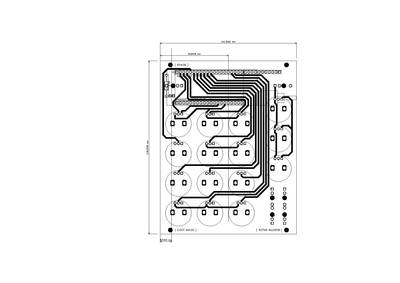
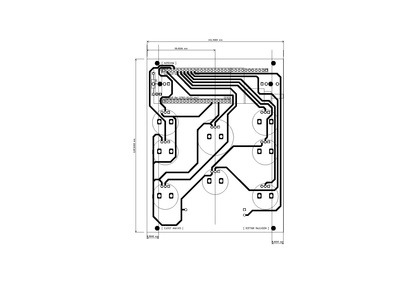
[ PCB layouts ]
Creating the layouts for 2-layered PCBs for all modules (front and back)

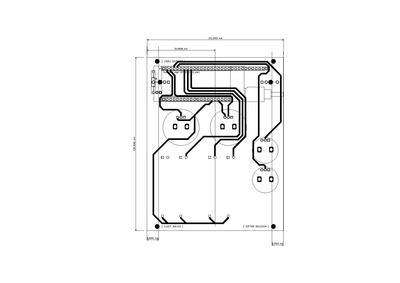

[ paper mockups ]
Test printing the PCB layout and placing the electronic components to review the physical interfaces before production


[ PCB unboxing ]


[ PCB assembly & setup ]


[ final modules ]


grad show
[ setup ]
For the graduation show I envision an interactive installation where the modules can be used and tested and where conversations about tools could arise. In the future I am hoping to integrate the modules in the workshops that I regularly facilitate for graphic designers.

[ radio show ]
- conversation about our projects and practices with Supi
- informercial to tease my project
script for informercial:
MODULAR MATTER – REWIRE YOUR PRINTS!
Are you tired of your usual Desktop Publishing setup and need to switch things up?
Then this modular tool is for you!
Combine the new hardware modules DYNAMIC GLYPH, FRICTION LABEL, WHOOSH, FUTURE RELICS, WEAVER and EMERGENT MATTER to create unexpected and exciting print results!
MODULAR MATTER – REWIRE YOUR PRINTS!
[ blob shop ]
goods I want to sell at the shop:
- MODULAR MATTER toolkit (PCBs + electronic components + Situated and Annotated Manual)
- DRAWING ROBOT POSTERS
- GHOST CIRCUITS
tools & components in use
(honest) list of (almost) all things that were used (or not) in the process of developing, planning, building, assembling, documenting and presenting the project
[ digital tools ]
- Raspberry Pi Zero
- python 3
- ESP32
- C++
- terminal
- bash
- postscript
- ghostscript viewer
- KiCad
- Atom
- InDesign
- Photoshop
- Acrobat Pro
- Safari
- Preview
- Notes
- MacBook Pro
- iPhone
[ physical tools & materials ]
- soldering iron
- solder
- sponge
- breadboards
- jumper wires
- wire cutter
- awl
- scredriver
[ electronic components for the tool itself ]
- 1 Raspberry Pi Zero
- 6 ESP32 (LilyGO TTGO T8 ESP32-S2 - with SD Card Slot)
- 1 DFRobot I2C 16x2 Arduino LCD
- 30 10k rotary potentiometers
- 25 knobs small
- 4 knobs medium
- 1 knob large
- 8 10k slide potentiometers
- 5 push buttons
- 1 slide switches
- 1 rotary encoder
- 5 3mm LEDs
- 5 1k resistors
- 16 audio jacks
- 10 x 20 pinheaders
- 1 x 4 pinheader 90 degree
- 24 M3 bolts and nuts 30mm
- 4 M3 bolts and nuts 10mm
- 10 audio patch cables
- 6 power supplies
- 1 screen + HDMI cable + power supply
- 1 printer + USB cable + power supply
[ services & shops ]
- Tinytronics
- Musicstore
- Wetronic
- Seeed Studio PCB manufacturer
- DHL