Pushing the Score-publication: Difference between revisions
No edit summary |
No edit summary |
||
| Line 3: | Line 3: | ||
=git repositories= | ==git repositories== | ||
GPIO https://git.pzimediadesign.nl/repos/pushingscore_gpio.git/ | GPIO https://git.pzimediadesign.nl/repos/pushingscore_gpio.git/ | ||
git clone https://git.pzimediadesign.nl/repos/pushingscore_gpio.git/ | git clone https://git.pzimediadesign.nl/repos/pushingscore_gpio.git/ | ||
=pads= | ==pads== | ||
* https://pad.pzimediadesign.nl/p/pushing_the_score_-_publication | * https://pad.pzimediadesign.nl/p/pushing_the_score_-_publication | ||
=RPi3 setup= | ==RPi3 setup== | ||
On a different page because it's going to be quite long... [[The Ultimate RPi Installation Guide]] | On a different page because it's going to be quite long... [[The Ultimate RPi Installation Guide]] | ||
=Pi skin conductivity= | ==Pi skin conductivity== | ||
Aims: | Aims: | ||
* 3 pairs of GPIO pins are used as to capture skin conductivity | * 3 pairs of GPIO pins are used as to capture skin conductivity | ||
| Line 25: | Line 25: | ||
==hardware == | ===hardware === | ||
* Rpi breakout board (cobbler) + cable from GPIO to breakout board cable. | * Rpi breakout board (cobbler) + cable from GPIO to breakout board cable. | ||
** buy https://www.kiwi-electronics.nl/40-weg-t-cobbler-breakout-board-voor-raspberry-pi-model-b-plus-kit | ** buy https://www.kiwi-electronics.nl/40-weg-t-cobbler-breakout-board-voor-raspberry-pi-model-b-plus-kit | ||
| Line 48: | Line 48: | ||
* https://www.raspberrypi.org/documentation/usage/gpio-plus-and-raspi2/ | * https://www.raspberrypi.org/documentation/usage/gpio-plus-and-raspi2/ | ||
==Software== | ===Software=== | ||
===libaries=== | ====libaries==== | ||
install pip | install pip | ||
apt-get install python-pip | apt-get install python-pip | ||
| Line 60: | Line 60: | ||
pip install pyOSC | pip install pyOSC | ||
==scripts== | ===scripts=== | ||
https://git.pzimediadesign.nl/repos/pushingscore_gpio.git/ | https://git.pzimediadesign.nl/repos/pushingscore_gpio.git/ | ||
== Circuit == | === Circuit === | ||
http://razzpisampler.oreilly.com/images/rpck_1202.png | http://razzpisampler.oreilly.com/images/rpck_1202.png | ||
I am using 500K variable resistor(pot) instead. | I am using 500K variable resistor(pot) instead. | ||
==touch pressure== | ===touch pressure=== | ||
[[File:GPIO-touch.jpg|right]] | [[File:GPIO-touch.jpg|right]] | ||
| Line 82: | Line 82: | ||
[[File:py-osc-pd.png|Python sending values to PD over OSC|]] | [[File:py-osc-pd.png|Python sending values to PD over OSC|]] | ||
== components == | === components === | ||
* Pi cobler | * Pi cobler | ||
| Line 100: | Line 100: | ||
Aantal: 3 | Aantal: 3 | ||
==To Do== | ===To Do=== | ||
* design circuit in small prototyping strip board | * design circuit in small prototyping strip board | ||
* change and test script with more than 1 circuit | * change and test script with more than 1 circuit | ||
Revision as of 17:05, 27 February 2017
git repositories
GPIO https://git.pzimediadesign.nl/repos/pushingscore_gpio.git/
git clone https://git.pzimediadesign.nl/repos/pushingscore_gpio.git/
pads
RPi3 setup
On a different page because it's going to be quite long... The Ultimate RPi Installation Guide
Pi skin conductivity
Aims:
- 3 pairs of GPIO pins are used as to capture skin conductivity
- python reads GIOP (should run as a deamon)
- OSC sends messages from py to pd
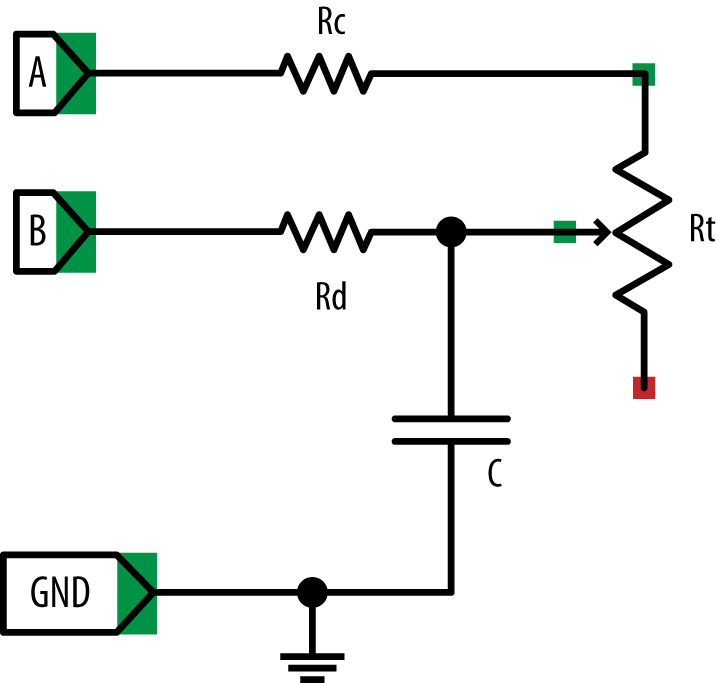
Pis have no ADC, therefore the simple way to read a Pot's value is via a step response technique as explained in http://razzpisampler.oreilly.com/ch08.html
hardware
- Rpi breakout board (cobbler) + cable from GPIO to breakout board cable.
- 1x 220 nF capacitor
- 2x 1Ohn resistor
550 ohm pot (values go between 0-800)OR metal points
notes on RPi GPIO
In model 1 there were only 26 in the following configuration

Model 2 B and 3 B keep the same configuration for the first 26 pins, but expand it to 40 pins, in the following configuration

links:
- https://learn.adafruit.com/introducing-the-raspberry-pi-model-b-plus-plus-differences-vs-model-b/gpio-port
- https://www.raspberrypi.org/documentation/usage/gpio/
- https://www.raspberrypi.org/documentation/usage/gpio-plus-and-raspi2/
Software
libaries
install pip
apt-get install python-pip
Pi python lib RPi.GPIO https://pypi.python.org/pypi/RPi.GPIO
apt-get install python-rpi.gpio
pyOSC (is not on minibian repos )
pip install pyOSC
scripts
https://git.pzimediadesign.nl/repos/pushingscore_gpio.git/
Circuit

I am using 500K variable resistor(pot) instead.
touch pressure
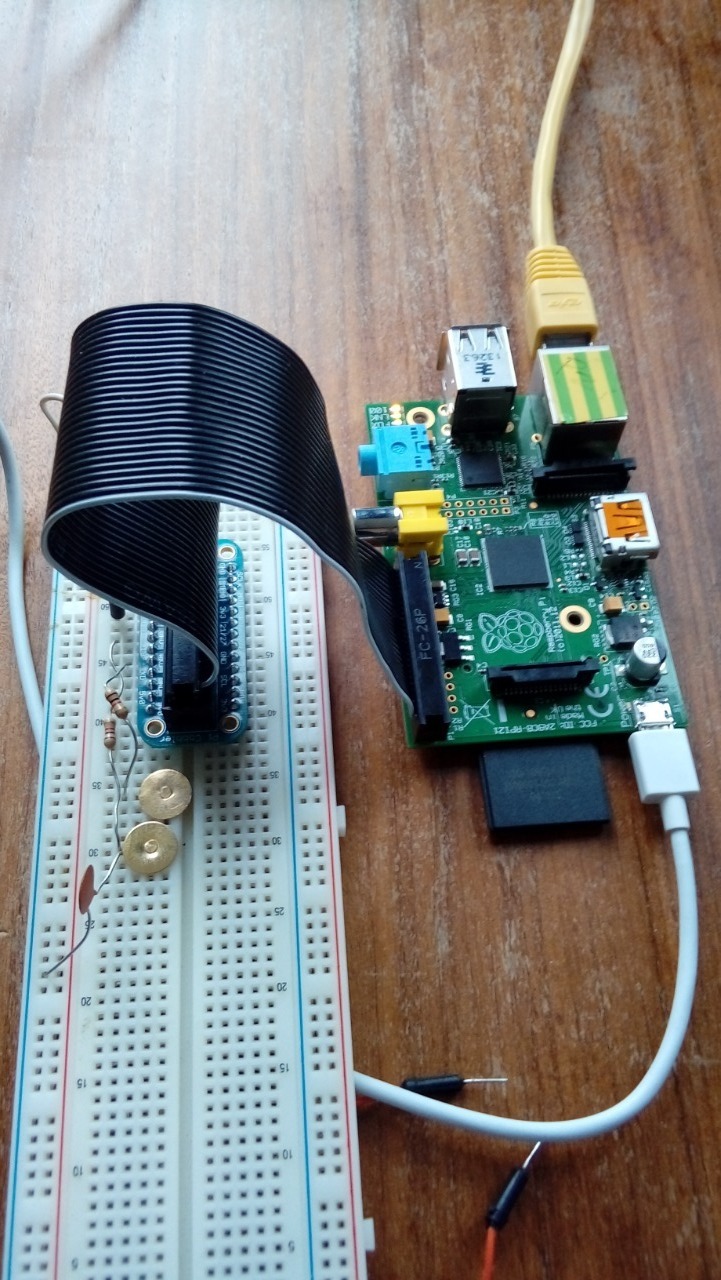
In order to use touch pressure: I kept the circuit only replacing the variable resistor with 2 metal pins.
The result is very interesting.
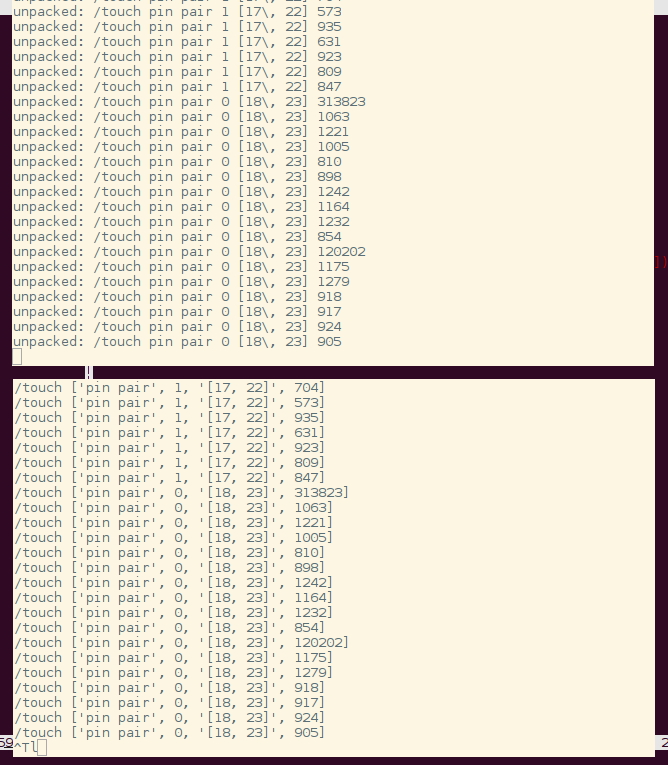
- because the circuit is interrupted while no one is touching, the stream or reading is interrupted
- values can go from:
- Max: 3 (very strong,wet contact) (0 if there is a metal connection )
- Min: 273337
components
- Pi cobler
- Electronics:
Weidmuller PM 5.08 Series 5.08mm Pitch Straight PCB Terminal Block with Leaf Spring, Screw Termination, Through Hole RS-stocknummer: 425-8720 Aantal: 30
Murata Single Layer Ceramic Capacitor (SLCC) 220nF 50 V dc ±10% X7R Dielectric RPER7 Series Through Hole RS-stocknummer: 721-5262 Aantal: 30
RE520-HP, Single-Sided Stripboard FR-2 100 x 160 x 1.5mm FR1 RS-stocknummer: 206-5841 Aantal: 3
To Do
- design circuit in small prototyping strip board
- change and test script with more than 1 circuit


