SSH proxy jump: Difference between revisions
mNo edit summary |
mNo edit summary |
||
| (17 intermediate revisions by 3 users not shown) | |||
| Line 8: | Line 8: | ||
The SSH proxy jump will make a connection to the sandbox through XPUB's XVM server. | The SSH proxy jump will make a connection to the sandbox through XPUB's XVM server. | ||
== | ==First make and upload a SSH key for your sandbox user== | ||
You can follow the instructions on this page: [[SSH]] | |||
These steps need to be done on your own computer. | |||
==Configure the SSH proxy jump== | |||
The SSH proxy jump works with a special user (called "jump") on the xvm (the XPUB server). We work with one shared pair of keys for this user: the '''jump user SSH keys'''. Everyone downloads these keys to their local <code>.ssh</code> folder, and the public <code>jump.pub</code> key is installed on the xvm. | |||
To do this, first download the jump keys from Zulip. The keys we use this year (2024/2026) can be found [https://zulip.xpub.nl/#narrow/stream/88-XPUB1/topic/Cereal.20Box.20SSH.20insturctions.3A/near/44170 here]. Save them to the <code>~/.ssh/</code> folder on your laptop (not on the sandbox!): | |||
jump | jump | ||
| Line 24: | Line 32: | ||
Host NAMEOFSANDBOX | Host NAMEOFSANDBOX | ||
Hostname 10.0.0. | Hostname 10.0.0.XX | ||
User USERNAME | User USERNAME | ||
ProxyJump xvm_jump | ProxyJump xvm_jump | ||
| Line 32: | Line 40: | ||
$ ssh NAMEOFSANDBOX | $ ssh NAMEOFSANDBOX | ||
==(for staff) generate and install new jump SSH keys== | |||
We started to work with a new set of keys for the jump user for each year, because passphrases were forgotten, or the keys somehow mysteriously did not work. | |||
So for a new year: | |||
# generate a new pair of keys | |||
# rename them to jump and jump.pub, and share them with the students on zulip | |||
# ssh into xvm, switch to the jump user: $ sudo su jump | |||
# copy one of the lines in /home/jump/.ssh/authorized_keys and add jump.pub | |||
==Uploading files with FTP== | |||
You can use the SSH shortcut from your config file, and SSH key that you generated. | |||
* '''servername''': <code>cerealbox</code> | |||
* '''key''': select <code>id_ed25519</code> | |||
===FileZilla=== | |||
Unfortunately, FileZilla does not support ProxyJump connections :(. | |||
===Cyberduck=== | |||
Install: https://cyberduck.io/ | |||
Howto: you can follow this screenshot that Sevgi made: | |||
[[File:Cyberduck-ssh-proxy-jump-setting.png|400px]] | |||
===Winscp=== | |||
Install: https://winscp.net/ | |||
Docs: https://winscp.net/eng/docs/ui_import#openssh_config | |||
Howto: i did not test winscp yet, but it should work in the same way as Cyberduck :fingers_crossed: | |||
Kiara's edit on how to connect through WinSCP: | |||
* In "Tabs" select "Sites" and "Sites Manager" | |||
[[File:Winscp01.png|frameless|center]] | |||
* There, bottom-left there is "Tools" - click on the arrow and "Import Sites" | |||
[[File:Winscp02.png|frameless|center]] | |||
* In "Import from" select "OpenSSH" | |||
[[File:Winscp03.png|frameless|center]] | |||
* Check all the sites you want to import and click "OK" | |||
* The sites now appear in the list, you just have to select the one corresponding to your server (at the time i'm writing this, our server is cerealbox) and connect to it! | |||
[[File:Winscp04.png|frameless|center]] | |||
===scp=== | |||
(using the terminal) | |||
You can also upload files through the terminal with scp. | |||
I made a short howto page on the wiki: [[Scp|scp]] | |||
==Claudio's notes == | |||
===Context=== | |||
On each year's server there are different users, including yours. | |||
When you connect to the server you normally type this in the terminal : | |||
<code>$ ssh + *yourusername + *ip address of the server</code> | |||
'''NOTE:''' your server's ip address might vary from time to time. | |||
Inside of the school this works, because you're connecting from your computer to the server under the same network, but how does it work from home or from outside of the school's walls in general? If you were at home and tried to use the same command formula you'd notice it wouldn't work. | |||
This is an example error: | |||
<code>$ ssh: connect to host 145.24.152.22 port 22: Connection timed out</code> | |||
If you're somewhere else outside of the school you have to connect to the XVM (XpubVirtualMachine) server, which is another public server that hosts all the sandboxes (and other things, like the programs we use like Mediawiki and Etherpad). The XVM is ''somewhere'', but definitely '''not''' in the building. Inside the XVM, you'll log into a public user called "jump", which is part of a private connection shared with your year's server (sandbox) that is not accessible to the broader "public" (VPN), through this connection you then connect to your server. | |||
To sum it up: | |||
the plan is not to connect to your server directly from your home to the school: | |||
(home → server = ERROR) | |||
but to connect to XVM first and then connecting to the server: | |||
(home → XVM → server = SUCCESS) | |||
===Practicalities=== | |||
Yes, but how? | |||
We'll use another method of authentication instead of the usual one (which is the ''password authentication'') called ''SSH key pairs''. | |||
When using this other method we won't be asked fora a password upon connecting, we'll check a match for IDs between our computer and the server we are trying to connect to. | |||
To generate your keys we use this command: | |||
'''NOTE:''' run this command from your local computer, not from the server. | |||
<code>$ ssh-keygen -t ed25519</code> | |||
You'll be asked some questions, like to put a passphrase and where to store the keys, if you continue to press enter everything will be generated with defaults (no passphrase and default location) | |||
These are '''your''' keys, one is '''private''' and the other is '''public''': | |||
* the private key: id_ed25519 | |||
* the public key: id_ed25519.pub | |||
'''IMPORTANT''': always use the .pub key, '''NEVER''' copy the private one (the one without file extension) | |||
You'll find your keys in your computer's user directory: | |||
* linux: <code>/home/USER/.ssh/...</code> | |||
* mac: <code>/Users/USER/.ssh/...</code> | |||
* windows: <code>C:\Users\USER\.ssh\...</code> | |||
Now you have to put your public key inside of your user on the server you want to log into. | |||
'''NOTE:''' the following steps assume you are inside the school: | |||
Log into your server (the "ssh + username + ip" formula used above) with password authentication. | |||
From your home, get into the directory .ssh/ | |||
<code>$ cd .ssh/</code> | |||
Open the '''authorized_keys''' file: | |||
<code>$ nano authorized_keys</code> | |||
paste inside your public key (the contents of id_ed25519.pub) | |||
Now that your key is on your user on your server, you can '''exit''' the server. | |||
from your local machine type: | |||
<code>$ ssh yourusername@yourserver </code> | |||
and it should work. | |||
There are fancier ways to this, like with a config file that allows you to use shortcuts, but for now this is the basic setup. | |||
You can check how to make the config file at this page: | |||
[[SSH#SSH_config_file]] | |||
anyways, here's what happened: | |||
☻ you send an ID for the key pair you're using to the server. | |||
☻ the server will check for the "authorized_keys" file on your user on the server you are trying to log in to. | |||
☻ if in the "authorized_keys" file there a match of your ID, a random message will be generated, encrypted, and sent back to you. | |||
☻ you will decrypt the message with your private key. | |||
☻ you send a message back to the server (ex. hello server, I've done my homework, here's the message decrypted). | |||
☻ the server compares the message it sent to the one you decrypted, if they match it proves you are you (wow) and you are authenticated. | |||
Latest revision as of 18:03, 19 January 2025
As the collective sandbox servers are hosted from the school, they use a hidden VPN network to connect to the internet, famously known as the HUB.
To be able to SSH to a sandbox server from outside of the school, you can use a SSH proxy jump.
The SSH proxy jump will make a connection to the sandbox through XPUB's XVM server.
First make and upload a SSH key for your sandbox user
You can follow the instructions on this page: SSH
These steps need to be done on your own computer.
Configure the SSH proxy jump
The SSH proxy jump works with a special user (called "jump") on the xvm (the XPUB server). We work with one shared pair of keys for this user: the jump user SSH keys. Everyone downloads these keys to their local .ssh folder, and the public jump.pub key is installed on the xvm.
To do this, first download the jump keys from Zulip. The keys we use this year (2024/2026) can be found here. Save them to the ~/.ssh/ folder on your laptop (not on the sandbox!):
jump
jump.pub
Copy the following config file, change the USERNAME to your username, and save it to ~/.ssh/config on your laptop:
Host xvm_jump
User jump
Hostname 194.61.65.6
Port 2501
Identityfile ~/.ssh/jump

Host NAMEOFSANDBOX
Hostname 10.0.0.XX
User USERNAME
ProxyJump xvm_jump
Identityfile ~/.ssh/id_ed25519
Now, you should be able to ssh to the sandbox, both from the school and outside the school, with this command:
$ ssh NAMEOFSANDBOX
(for staff) generate and install new jump SSH keys
We started to work with a new set of keys for the jump user for each year, because passphrases were forgotten, or the keys somehow mysteriously did not work.
So for a new year:
- generate a new pair of keys
- rename them to jump and jump.pub, and share them with the students on zulip
- ssh into xvm, switch to the jump user: $ sudo su jump
- copy one of the lines in /home/jump/.ssh/authorized_keys and add jump.pub
Uploading files with FTP
You can use the SSH shortcut from your config file, and SSH key that you generated.
- servername:
cerealbox - key: select
id_ed25519
FileZilla
Unfortunately, FileZilla does not support ProxyJump connections :(.
Cyberduck
Install: https://cyberduck.io/
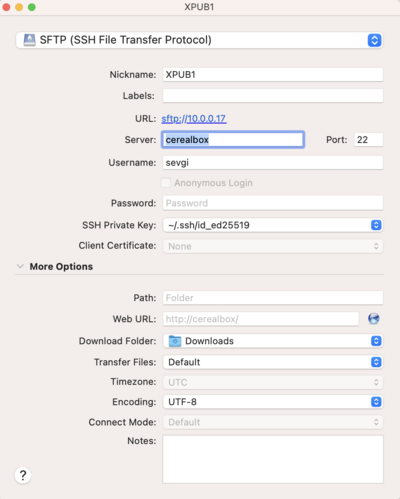
Howto: you can follow this screenshot that Sevgi made:
Winscp
Install: https://winscp.net/
Docs: https://winscp.net/eng/docs/ui_import#openssh_config
Howto: i did not test winscp yet, but it should work in the same way as Cyberduck :fingers_crossed:
Kiara's edit on how to connect through WinSCP:
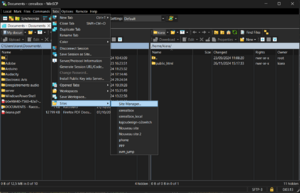
- In "Tabs" select "Sites" and "Sites Manager"
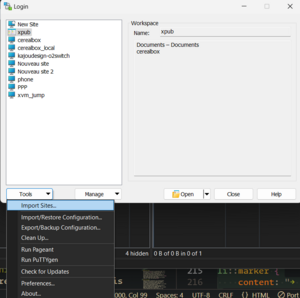
- There, bottom-left there is "Tools" - click on the arrow and "Import Sites"
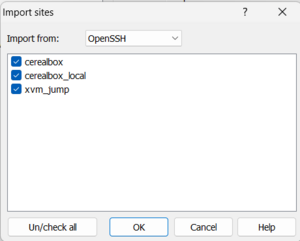
- In "Import from" select "OpenSSH"
- Check all the sites you want to import and click "OK"
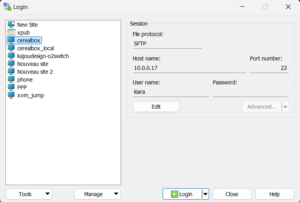
- The sites now appear in the list, you just have to select the one corresponding to your server (at the time i'm writing this, our server is cerealbox) and connect to it!
scp
(using the terminal)
You can also upload files through the terminal with scp.
I made a short howto page on the wiki: scp
Claudio's notes
Context
On each year's server there are different users, including yours.
When you connect to the server you normally type this in the terminal :
$ ssh + *yourusername + *ip address of the server
NOTE: your server's ip address might vary from time to time.
Inside of the school this works, because you're connecting from your computer to the server under the same network, but how does it work from home or from outside of the school's walls in general? If you were at home and tried to use the same command formula you'd notice it wouldn't work.
This is an example error:
$ ssh: connect to host 145.24.152.22 port 22: Connection timed out
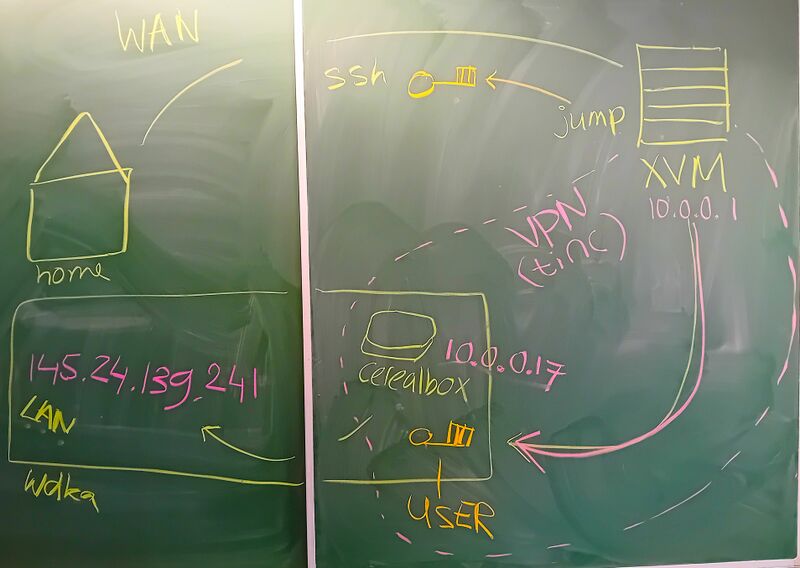
If you're somewhere else outside of the school you have to connect to the XVM (XpubVirtualMachine) server, which is another public server that hosts all the sandboxes (and other things, like the programs we use like Mediawiki and Etherpad). The XVM is somewhere, but definitely not in the building. Inside the XVM, you'll log into a public user called "jump", which is part of a private connection shared with your year's server (sandbox) that is not accessible to the broader "public" (VPN), through this connection you then connect to your server.
To sum it up:
the plan is not to connect to your server directly from your home to the school:
(home → server = ERROR)
but to connect to XVM first and then connecting to the server:
(home → XVM → server = SUCCESS)
Practicalities
Yes, but how?
We'll use another method of authentication instead of the usual one (which is the password authentication) called SSH key pairs.
When using this other method we won't be asked fora a password upon connecting, we'll check a match for IDs between our computer and the server we are trying to connect to.
To generate your keys we use this command:
NOTE: run this command from your local computer, not from the server.
$ ssh-keygen -t ed25519
You'll be asked some questions, like to put a passphrase and where to store the keys, if you continue to press enter everything will be generated with defaults (no passphrase and default location)
These are your keys, one is private and the other is public:
- the private key: id_ed25519
- the public key: id_ed25519.pub
IMPORTANT: always use the .pub key, NEVER copy the private one (the one without file extension)
You'll find your keys in your computer's user directory:
- linux:
/home/USER/.ssh/... - mac:
/Users/USER/.ssh/... - windows:
C:\Users\USER\.ssh\...
Now you have to put your public key inside of your user on the server you want to log into.
NOTE: the following steps assume you are inside the school:
Log into your server (the "ssh + username + ip" formula used above) with password authentication.
From your home, get into the directory .ssh/
$ cd .ssh/
Open the authorized_keys file:
$ nano authorized_keys
paste inside your public key (the contents of id_ed25519.pub)
Now that your key is on your user on your server, you can exit the server.
from your local machine type:
$ ssh yourusername@yourserver
and it should work.
There are fancier ways to this, like with a config file that allows you to use shortcuts, but for now this is the basic setup.
You can check how to make the config file at this page:
anyways, here's what happened:
☻ you send an ID for the key pair you're using to the server.
☻ the server will check for the "authorized_keys" file on your user on the server you are trying to log in to.
☻ if in the "authorized_keys" file there a match of your ID, a random message will be generated, encrypted, and sent back to you.
☻ you will decrypt the message with your private key.
☻ you send a message back to the server (ex. hello server, I've done my homework, here's the message decrypted).
☻ the server compares the message it sent to the one you decrypted, if they match it proves you are you (wow) and you are authenticated.

