Microcontroller 101: Difference between revisions
| Line 214: | Line 214: | ||
=16-04-24 motors + sensors = robot= | =16-04-24 motors + sensors = robot= | ||
===motors=== | |||
===sensors=== | ===sensors=== | ||
====humidity==== | ====humidity==== | ||
Revision as of 16:09, 15 April 2024
ḿ̬̏ͤͅỉ͔͖̜͌c͕͗ͤ̕̕r̴̨̦͕̝o̯̱̊͊͢c͕͗ͤ̕̕o̯̱̊͊͢ṇ̤͛̒̍t̲̂̓ͩ̑r̴̨̦͕̝o̯̱̊͊͢l̙͖̑̾ͣl̙͖̑̾ͣẹ̿͋̒̕r̴̨̦͕̝ 1̨̹̦͍̀0̗̜͕̅̃1̨̹̦͍̀
09-04-2024 e͎l͎e͎c͎t͎r͎i͎c͎
https://pzwiki.wdka.nl/mw-mediadesign/images/7/7e/Cricket.mp4
sensors and actuators
introduction to Arduino
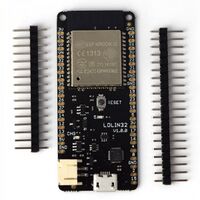
LOLIN 32 Installation party :~)
more info about the lolin32 is here: https://www.wemos.cc/en/latest/d32/d32_pro.html
step 1: download Arduino software
step 2: download driver for microcontroller
step 3: install driver
_windows: open Device Manager >> find UART device >> right click and update driver >> select driver
Hello World!
in the Arduino program, select the correct board (WEMOS LOLIN32) and select the USB port you are using (if you are unsure, check the listed ports, unplug and see what changed)
void setup() {
  Serial.begin(115200);
}

void loop() {
  Serial.println("Hello World!");   //sends a message to the computer
}
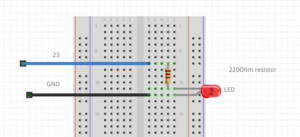
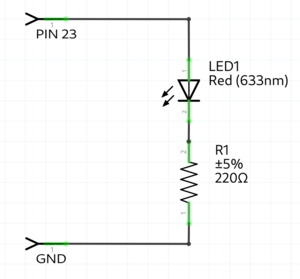
Simple Led blink example
// always use a "preresistor" with the LED, because the 5v coming from the microcontroller is too much
// a LED only consumes ~2.5 volt, the resistor the other volt
//

int ledPin = 23;               //the int ledPin is 13

void setup() {
  pinMode(ledPin,OUTPUT);      //ledPin is a OUTPUT
}

void loop() {
  digitalWrite(ledPin,HIGH);   //turns pin 13 on
  delay(500);                  //stops the loop for 500 milliseconds
  digitalWrite(ledPin,LOW);    //turns pin 13 off
  delay(500);                  //stops the loop for 500 milliseconds
}
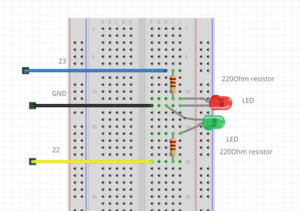
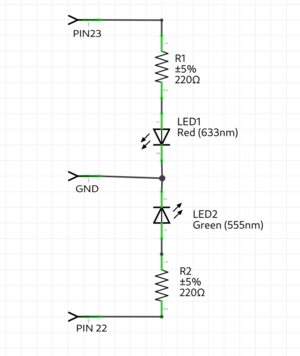
Traffic light example
int RedLedPin = 23;                 //the int RedLedPin is 13
int GreenLedPin = 22;               //the int GreenLedPin is 12

void setup() {
  pinMode(RedLedPin,OUTPUT);        //ledPin is a OUTPUT
  pinMode(GreenLedPin,OUTPUT);      //ledPin is a OUTPUT

}

void loop() {
  digitalWrite(GreenLedPin,HIGH);   //turns green led  on
  delay(5000);                      //stops the loop for 5000 milliseconds
  for(int i = 0; i < 5; i++){       //this for loop gets 5 times repeated
    digitalWrite(GreenLedPin,LOW);  //turns green led off
    delay(500);                     //stops the loop for 500 milliseconds
    digitalWrite(GreenLedPin,HIGH); //turns green led off
    delay(500);                     //stops the loop for 500 milliseconds
  }
  digitalWrite(GreenLedPin,LOW);    //turns green led off
  digitalWrite(RedLedPin,HIGH);     //turns red led on
  delay(5000);                      //stops the loop for 5000 milliseconds
  digitalWrite(RedLedPin,LOW);      //turns red led on
}
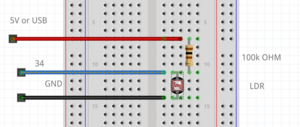
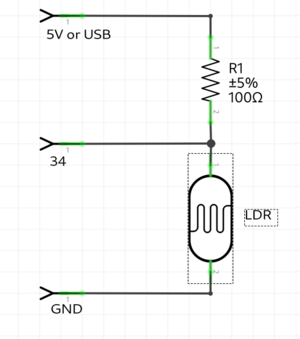
LDR example
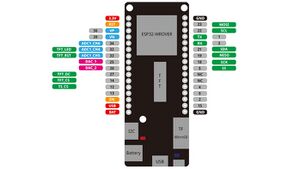
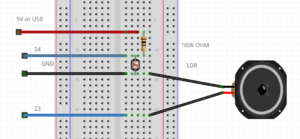
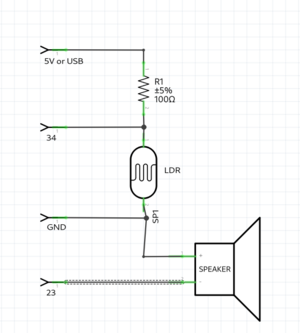
example with a light resistor. keep in mind the LDR pin needs to be a pin with a ADC(analog to digital converter), because you check the analog voltage. on the arduino these are the ANALOG IN pins. on the ESP32 the pins with the ADC(check the pinout graphic)
int LDR = 34;                 //the LDR pin

void setup() {
  Serial.begin(115200);
  pinMode(LDR,INPUT);        //LDR is an INPUT
}

void loop() {
  int value = analogRead(LDR); // read the analog value of the LDR
  Serial.println(value);       // print the value of the LDR, open serial monitor
  delay(10);
}
LDR & speaker example
int LDR = 34;                 //the LDR pin
int speaker = 23;

void setup() {
  Serial.begin(115200);
  pinMode(LDR,INPUT);        //LDR is an INPUT
  pinMode(speaker,OUTPUT);        //speaker is a OUTPUT
}

void loop() {
  int value = analogRead(LDR); // read the analog value of the LDR
  Serial.println(value);       // print the value of the LDR, open serial monitor
  tone(speaker,value);         //create a frequency on the speaker pin; the frequency hertz is the value
  delay(10);
}
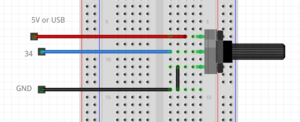
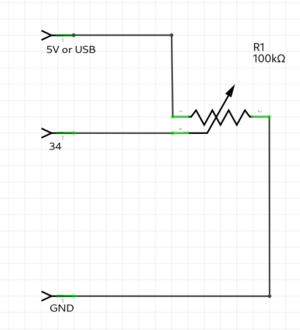
Poti example
int poti = 34;                 //the poti pin

void setup() {
  Serial.begin(115200);
  pinMode(poti,INPUT);        //poti is an INPUT
}

void loop() {
  int value = analogRead(poti); // read the analog value of the poti
  Serial.println(value);       // print the value of the poti, open serial monitor
  delay(10);
}
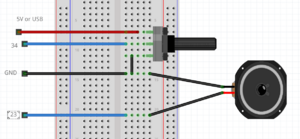
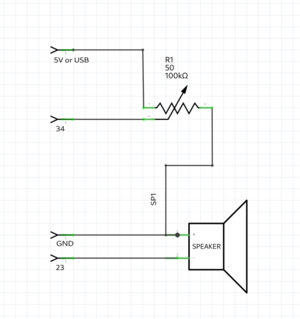
Poti & speaker example
//keep in mind you can only use a mini speaker. for bigger speakers you need an amplifier.
int poti = 34;                 //the pto pin
int speaker = 23;

void setup() {
  Serial.begin(115200);
  pinMode(poti,INPUT);        //poti is an INPUT
  pinMode(speaker,OUTPUT);        //speaker is a OUTPUT
}

void loop() {
  int value = analogRead(poti); // read the analog value of the poti
  Serial.println(value);       // print the value of the poti, open serial monitor
  tone(speaker,value);         //create a frequency on the speaker pin; the frequency hertz is the value
  delay(10);
}
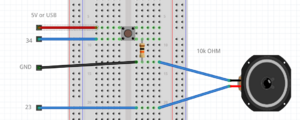
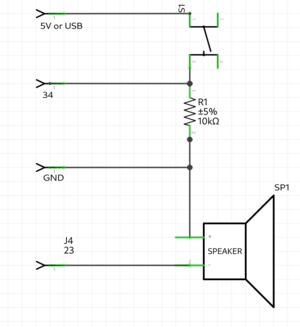
Button & alarm example
int button = 34;
int speaker = 23;

void setup() {
  Serial.begin(115200);   //make usb connection
  pinMode(button, INPUT);    //button is an INPUT
  pinMode(speaker, OUTPUT);    //speaker is an OUTPUT

}

void loop() {
  bool value = digitalRead(button);    //read the digital value of button
  if(button){
    Serial.println("start alarm");
    for(int repeter = 0; repeter<5; repeter++){   //repeat 5 times
      for(int frequency = 500; frequency<1200; frequency++){    //count from 500 to 1200
        tone(speaker, fequency);    //generate the frequency on the speaker pin
        delay(5);
      }
      notone(speaker);    //turn off the speaker pin
      delay(500);         //
    }
  }else{
    Serial.println("button not pressed");
  }
}
16-04-24 motors + sensors = robot
motors
sensors
humidity
arduino code
#include <DHT.h>;

//Constants
#define DHTPIN 21     // what pin we're connected to
#define DHTTYPE DHT22   // DHT 22  (AM2302)
DHT dht(DHTPIN, DHTTYPE); //// Initialize DHT sensor for normal 16mhz Arduino


//Variables
int chk;
float hum;  //Stores humidity value
float temp; //Stores temperature value

void setup()
{
    Serial.begin(9600);
	dht.begin();

}

void loop()
{
    //Read data and store it to variables hum and temp
    hum = dht.readHumidity();
    temp= dht.readTemperature();
    //Print temp and humidity values to serial monitor
    Serial.print("Humidity: ");
    Serial.print(hum);
    Serial.print(" %, Temp: ");
    Serial.print(temp);
    Serial.println(" Celsius");
    delay(2000); //Delay 2 sec.
}

