
User:Ssstephen/ssskills
i <3 techne
20220922 Industrial Sewing
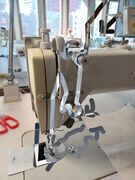
How to thread the Global 3200-AUT. Or ask at the fabric station.
The fictional theory of carrier bags


Takes real craft skills that I dont currently have 😬 Will need to work on this if planning to use it as a skill. They also have a heavy duty machine for leathers etc. and heavier threads. I love how it is soft and flexible, this doesn't often show up in my work (except prints on fabrics) so definitely interested to explore further.
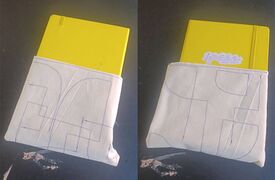
20220928 Lasercutting
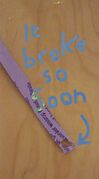
Wearable text with short lifespan
Lasers cutting


Nice potential for control panel fabrication from acrylic, wood, etc. CNC milling machine for bigger parts but cant cut metal unfortunately (which is so much handier for grounding reasons). Lasercutter is super quick though so probably good for prototypes. Can cut greyboard which seems v interesting, as well as possibility to experiment with materials. Made some text pattern thing on faux-rubber bracelets which took maybe an hour to kiss-cut, while simpler cuts were under a minute.
#f00 0.01mm stroke = cut
#00f 0.01mm stroke = kiss-cut
#000 fill (and everything else) = engrave/etch
Links for lasercutting boxes and other stof
mywdka.nl boxes.py instructions quick start makercase.com PePaKuRa kunststofshop.nl slic3r
20220929 Paper making
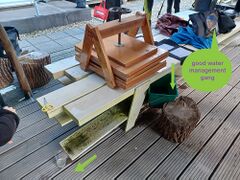
a press squeezing water out of freshly poured paper, water being reclaimed
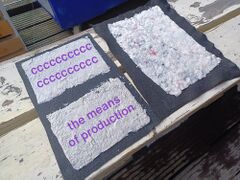
handmade paper from plant matter, waste paper and rainwater


Paper is made from paper
Wilco from the Publication Station.
Paper making is super fun just because it is. With Spin and the Publication Station. It uses a lot of water even on this small scale so nice to consider using rainwater, as well as possibly reclaiming the water from the process. Remember to soak pulp overnight if doing it again. Also fun fact paper from wood was only popularised in the mid 1800s (before that made from cotton).
20221005 3D printing
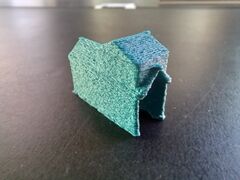
a fuzzy house

mywdka [Notes on Volumetric Regimes] [[1]]
Another vector machine forced into raster labour. The slicer (eg Ultimaker Cura) is a piece of software that takes a volume, usually in a .obj format, and converts it into a movement or path or noodling-strategy or dance or .gcode file. But this noodling is always in the form of a raking across the xy plane, which is then repeated and layered in the z axis.
'Raster' meaning screen, rake, scrape.
'FullControl GCode' is an interesting name because it offers full freedom in the xyz space.
20221010-17 Woodworkshop
I done made a box.
20221011-18 Metalworkshop
I done made a house.
20221011 Embroidery
A digital emboidery machine, if you give the software closed paths it can generate some interesting fill stitches as well as stroke stitches.
The PES filetype is proprietary and closed! There is an online converter (and viewer) that lists gcode as a possible translation, I wonder if an inkscape extension could bypass the proprietary stuff: https://inkscape.org/~Kaalleen/%E2%98%85inkstitch-embroidery-extension also this URL has a star in it :O
20230209-10 WAMIA
1st workshop on the appropriation, modification and intervention on an (home) appliance (WAMIA). A new friend called Thunder who is a Roomba that listens to (and plays) MIDI notes sent over WiFi.
Also liberating home appliances from their exploitation.
20230221 DSP Workshop
Workshop with Joseph about Pure Data and DSP in general. Pure Data is nice, it uses a graphic patching environment like Max.
I made a sort of FFT resynthesis effect roughly following this tutorial.
We also had an interesting dicussion about variable sample rates and compression, could you have vector sampling? More like approximating the curve or simplifying the number of points on the path.
20230308 Living Station
Petri dishes! Snowflakes! USB microscope! DSLR microscope! Maintaining a sterile environment! Moss! Kombucha leather!
20230309 Que(e)rying Wikidata
Experimental (scholarly) publishing group at COPIM
Computational and combinatorial books: reusing text more extensively than classical citations. Data books: where does the book end and the material that it's based on start?
Standardised implementation of semantic web. Wikidata is a centrepoint of the semantic web.
Then we made house of dust style wikidata poems.
20230421, 0428, 0512 Arduino Lights
More amps = good
More volts = really bad
Trying to send microphone signal to an LED strip. But the microphone is really noisey I think? Also a potentiometer controlling the green channel.
// NeoPixel Ring simple sketch (c) 2013 Shae Erisson
// Released under the GPLv3 license to match the rest of the
// Adafruit NeoPixel library

#include <Adafruit_NeoPixel.h>
#ifdef __AVR__
 #include <avr/power.h> // Required for 16 MHz Adafruit Trinket
#endif

// Which pin on the Arduino is connected to the NeoPixels?
#define PIN        6 // On Trinket or Gemma, suggest changing this to 1

// How many NeoPixels are attached to the Arduino?
#define NUMPIXELS 30 // Popular NeoPixel ring size

int redness = 0; // colour variable
int greenness = 0; // colour variable
int lastDelta = 0;

int ledPin=13;
int sensorPin=7;
boolean val =0;
int audioIn = 0;
int potIn = 0;

// When setting up the NeoPixel library, we tell it how many pixels,
// and which pin to use to send signals. Note that for older NeoPixel
// strips you might need to change the third parameter -- see the
// strandtest example for more information on possible values.
Adafruit_NeoPixel pixels(NUMPIXELS, PIN, NEO_GRB + NEO_KHZ800);

#define DELAYVAL 500 // Time (in milliseconds) to pause between pixels

void setup() {
  pinMode(ledPin, OUTPUT);
  pinMode(sensorPin, INPUT);
  Serial.begin (9600);
  // These lines are specifically to support the Adafruit Trinket 5V 16 MHz.
  // Any other board, you can remove this part (but no harm leaving it):
#if defined(__AVR_ATtiny85__) && (F_CPU == 16000000)
  clock_prescale_set(clock_div_1);
#endif
  // END of Trinket-specific code.

  pixels.begin(); // INITIALIZE NeoPixel strip object (REQUIRED)
}

void loop() {
  pixels.clear(); // Set all pixel colors to 'off'

  int mn = 1024;
  int mx = 0;

  for (int i = 0; i < 100; ++i) {
    int val = analogRead(A0);
    mn = min(mn, val);
    mx = max(mx, val);
  }
  int delta = mx - mn;

  // Serial.println("delta: ");
  Serial.println(delta);

  // val =digitalRead(sensorPin);
  // audioIn =analogRead(A0);
  potIn =analogRead(A1);
  // Serial.println (audioIn);
  // when the sensor detects a signal above the threshold value, LED flashes
  if (delta>=500) {
    digitalWrite(ledPin, HIGH);
  }
  else {
    digitalWrite(ledPin, LOW);
  }

  // redness = (redness+1)%255;
  redness = map(delta, 0 , potIn, 0 , 255);
  // if(delta>=lastDelta){
  //   redness++;
  // }else{
  //   redness--;
  // }
  // Serial.println("redness: ");
  // Serial.println(redness);
  // greenness = map(potIn, 0 , 1024, 0 , 255);
  greenness = 0;
  // The first NeoPixel in a strand is #0, second is 1, all the way up
  // to the count of pixels minus one.
  for(int i=0; i<NUMPIXELS; i+=3) { // For each pixel...

    // pixels.Color() takes RGB values, from 0,0,0 up to 255,255,255
    // Here we're using a moderately bright green color:
    pixels.setPixelColor(i, pixels.Color(redness, greenness, 100));

    pixels.show();   // Send the updated pixel colors to the hardware.

    // delay(DELAYVAL); // Pause before next pass through loop
  }
  lastDelta = delta;
}
Links
https://www.hackster.io/sainisagar7294/arduino-vu-meter-using-neopixel-led-cdff7e
https://learn.adafruit.com/adafruit-neopixel-uberguide/arduino-library-use
https://randomnerdtutorials.com/guide-for-microphone-sound-sensor-with-arduino/
https://www.circuitbasics.com/how-to-use-microphones-on-the-arduino/
https://www.arduino.cc/en/Tutorial/BuiltInExamples/AnalogInput
0512 Voltages and Switches
Relays can be normally open (NO) or normally closed (NC). There is a control circuit (eg 5V) and a load circuit (eg 240V). Relays are usually Active Low, so they should receive a high signal, when it drops to low it switches the relay (eg closes it if it is NO).
An LDR controls the speed of the relay, which controls a light, which controls the LDR. Ouroboros swing 🐍.
// variables and stuff
const int RELAY_PIN = 3;
const int RELAY_PIN2 = 4;
const int LDR_PIN = A0;
unsigned long speed = 250;
unsigned long previousMillis = 0;        // will store last time LED was updated
int relayState = HIGH;             // ledState used to set the LED
int intervals[] = {4,2,1,1,8,2,4,2};
int currentStep = 0;
unsigned long previousMillis2 = 0;        // will store last time LED was updated
int relayState2 = HIGH;             // ledState used to set the LED
int intervals2[] = {8,2,1,4,2,1,2,1};
int currentStep2 = 0;

// the setup function runs once when you press reset or power the board
void setup() {
  Serial.begin(9600);
  // initialize digital pin LED_BUILTIN as an output.
  pinMode(RELAY_PIN, OUTPUT);
  pinMode(RELAY_PIN2, OUTPUT);

  // initialize analog pin as an input.
  pinMode(LDR_PIN, INPUT);
}

// the loop function runs over and over again forever
void loop() {
  unsigned long currentMillis = millis();
  unsigned long currentMillis2 = millis();

  //read LDR sensor data and use it to determine speed interval
  int LDR_state = analogRead(LDR_PIN);
  int speed = map(LDR_state, 0 , 1023, 1200, 50);
  //print it on serial monitor
  Serial.println(speed);

  if(currentMillis - previousMillis >= intervals[currentStep]*speed){
    previousMillis = currentMillis;

    if (relayState == LOW) {
      relayState = HIGH;
    } else {
      relayState = LOW;
    }
    digitalWrite(RELAY_PIN, relayState);  // turn the LED on (HIGH is the voltage level)
    currentStep = (currentStep + 1) % 8;
  }
  if(currentMillis2 - previousMillis2 >= intervals2[currentStep2]*speed){
    previousMillis2 = currentMillis2;

    if (relayState2 == LOW) {
      relayState2 = HIGH;
    } else {
      relayState2 = LOW;
    }
    digitalWrite(RELAY_PIN2, relayState2);  // turn the LED on (HIGH is the voltage level)
    currentStep2 = (currentStep2 + 1) % 8;
  }

}