
User:Riviera/February 17 2024

The cover of the Chess Diary is not yet attached to the spine
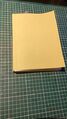
A blank cover for the chess diary
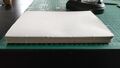
Sewn together signatures
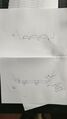
Roderick's diagram illustrating a technique to begin sewing signatures together
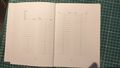
The content of the chess diary, not yet cut down to size


A Chess Diary Continued
Roderick and I met up on the afternoon of February 17th. Roderick had been able to fix the printing issue we were having last time. Since our previous meeting some minor edits were made to the pdf. Roderick had printed five copies comprised of five signatures each. Changes to the PDF included the addition of a blank page at the beginning, a colophon at the end and some adjustments to the page numbering. The pages were printed with crop and fold marks because the printing space had been resized to smaller dimensions. The edits to the pdf were made using Adobe software by someone Roderick knows.
We proceeded to fold the signatures. This was tricky as we were going against the natural grain of the paper. Roderick demonstrated a technique for folding. One creates an L-shape with one hand. The thumb is placed at the outer, bottom corner of the paper whilst the index finger is placed somewhere along the outside edge. Then one uses a runs a folding tool up and down the inside edge at a 45 degree angle to create a sharp fold. Having folded each of the signatures, it's necessary to punch holes along the inside edge. Again, Roderick demonstrated to me a technique for this. First, a punching template is designed on a separate piece of paper using a compass. Sewing stations are indicated to by short lines placed at regularly patterned intervals along the inside edge on the outside of the paper. Next, the folded edge of a signature is placed over the edge of a table. One takes the punching template in one hand and a punching needle in the other. The punching template is placed face-up halfway through the signature. The hand which holds the punching needle presses down on the paper to prevent it from moving. Aiming towards the body, holes are carefully punched through the paper at a 45 degree angle. These holes are made at the intervals indicated to by the punching template. Having punched holes in the inside edges of the signatures it's time to sew the signatures tightly together. Roderick showed me some tricks for threading the sewing needle to prevent the string from becoming disconnected from the needle. We measured out a length of string six times the length of the spine, because we had five signatures. Then, starting from the outside the signatures were sewn together. Roderick emphasised the importance of keeping the thread tight but not so tight that the paper rips. He also stated it was important to stitch the signatures together by making loops which go from below to above.
We sewed the signatures together and then set about gluing them together. We ran PVA glue up and down the spine and placed weight on the books to press them shut. Roderick spoke a bit about fly-sheets. He also spoke about the ways in which different bindings can impact how flat the pages lie when the book is open. I decided to make a prototype without fly sheets and Roderick made his with these included. To create covers for the book, we moved on to discuss the cover design. We chose some linen and cut this to size based on the sum of the width of the pages and the width of the spine. Despite that we have plans to use a foil press to design a pattern on the spine, we decided to add creases to the spines. Initially, we glued the linen to pieces of paper and used a press to flatten them whilst the glue dried. We took the paper-linen out of the press and cut it down to the correct dimensions for the book. To illustrate where the spine would be and where we would glue it the collection of signatures, we creased the cover using a metal creasing tool.
Next time we meet we are going to create covers using the foil press and hopefully attach the covers to the books.