
Optical character recognition with Tesseract
To get started
2 hi-res (300dpi) PDFs
- a usual PDF: in English, with a common font
- a unusual PDF: in a non-latin script, or with an unusual font or with abundant images
Install Tesseract + dependencies
Tesseract (with languages you will be using)
- Mac
brew install tesseract --all-languages - Debian/Ubuntu:
sudo aptitude install tesseract-ocr- See what language packages are available with:
sudo aptitude search tesseract-ocr- - install language packages:
sudo aptitude install tesseract-ocr-nld tesseract-ocr-port tesseract-ocr-spahere I am installing Dutch, Portuguese, Spanish
- See what language packages are available with:
poppler-utils whic include tools such as pdftotext and pdftohtml
- Mac
brew install poppler - Debian/Ubuntu:
sudo aptitude install poppler-utils
imagemagick
- Mac
brew install imagemagick - Debian/Ubuntu:
sudo aptitude install imagemagick
pdftk
- Mac
brew install pdftk - Debian/Ubuntu:
sudo aptitude install pdftk
- with text layer
- without text layer
To find out the difference you can try to select the PDF's text in a PDF viewer. Only if the text layer is present will you be able to select it.
If it contains a text layer you can use pdftotext command-line application (from poppler-utils) to convert the PDF to text
Tesseract
Tesseract was originally developed at Hewlett-Packard Laboratories Bristol and at Hewlett-Packard Co, Greeley Colorado between 1985 and 1994, with some more changes made in 1996 to port to Windows, and some C++izing in 1998. In 2005 Tesseract was open sourced by HP. Since 2006 it is developed by Google.
https://github.com/tesseract-ocr/tesseract/blob/master/README.md
The blog post that announced Tesseract's availability seems designed to nudge more people into action—current shortcomings are described in some detail, including trouble handling grayscale and color sources, a lack of page layout analysis features, and the program's only recognizing English-language documents. It reads less like an admission of faults than as a list of feature requests.
Bylund, Anders. 2006. ‘Google Releases Open-Source OCR Tool with HP Special Sauce’. Ars Technica. 5 September 2006. https://arstechnica.com/information-technology/2006/09/7664/.
One page prototype
Getting 1 page from PDF file with PDFTK burst:
$ pdftk yourfile.pdf burst
Or use imagemagick
$ convert -density 300 Typewriter\ Art\ -\ Riddell\ Alan.pdf Typewriter-%03d.tiff
Chose page you want to convert.
Convert PDF to bit-map using imagemagick, with some options to optimize OCR.
$ convert -density 300 page.pdf -depth 8 -strip -background white -alpha off ouput.tiff
-density 300resolution 300DPI. Lower resolutions will create errors :)-depth 8number of bits for color. 8bit depth == grey-scale-strip -background white -alpha offremoves alpha channel (opacity), and makes the background whiteoutput.tiffin previous versions Tesseract only accepted images as tiffs, but from v3 Tesseract accepts JPEG, PNG, TIFF, BMP, PNM GIF, and WEBPformats are accepted
Now we can do the OCR (optical character recognition) with Tesseract.
To render output.tiff into a a plain text file called output.txt, you can run:
$ tesseract output.tiff -l eng output
-l is the option for language (English is the default)
Improving image quality
There are several image transformation that will improved the OCR results.
See Tessearct page on improving quality of images for OCR.
You can also use Imagemagick and use the density and quality options to get a high res image:
$ convert -density 300 filename.pdf -quality 100 filename.jpg
Advanced

Language
Lists all tesseract languages available in your system.
$ tesseract --list-langs
If OCRing a document with more than one language Tesseract can use also more than one
$ tesseract output.tiff -l eng+spa output
Multipages
Tiff files can be multi-page images. Hence if we use the prevoious IM command to convert a PDF to a TIFF, if the PDF is multi page, so will be it TIFF. Which Tesseract should handle.
$ tesseract TypewriterArt.tiff TypewriterArt
Tesseract Open Source OCR Engine v3.03 with Leptonica
Page 1 of 8
Page 2 of 8
Page 3 of 8
Another option is providing Tesseract with a text file containing the path/filename to each image in sequence:
list.txt:
p001.tiff
p002.tiff
p003.png
$ tesseract list.txt output
Segmentation
Page Segmentation Mode (-psm) directs the layout analysis that Tesseract performs on the page.
By default, Tesseract automates the page segmentation, but does not perform orientation and script detection.
From Tesseract man page:
       -psm N
           Set Tesseract to only run a subset of layout analysis and assume a certain form of image. The options for N are:

               0 = Orientation and script detection (OSD) only.
               1 = Automatic page segmentation with OSD.
               2 = Automatic page segmentation, but no OSD, or OCR.
               3 = Fully automatic page segmentation, but no OSD. (Default)
               4 = Assume a single column of text of variable sizes.
               5 = Assume a single uniform block of vertically aligned text.
               6 = Assume a single uniform block of text.
               7 = Treat the image as a single text line.
               8 = Treat the image as a single word.
               9 = Treat the image as a single word in a circle.
               10 = Treat the image as a single character.
Searchable PDF
$ tesseract input.tiff output -l eng pdf
HOCR
Tesseract 3.0x supports a hocr option, which creates a hocr file.
HOCR is an HTML+XML (XHTML) file consisting of recognized words and their coordinates.
$ tesseract input.jpg output -l eng hocr
The HOCR file contains all pages as ocr_page elements, with attributes that contains the following fields:
ppageno: The physical page numberimage: The relative path (from the HOCR file) to the imagebbox: The dimensions of the image
The OCRed text is atomized into text elements of different magnitude, such as:
ocr_par: paragraphocr_line: lineocrx_word: word
HOCR tools:
Using HOCR
We will use an User Script instruction with a browser extension to run this user script, called Tampermonkey or Greasemonkey.
To install HOCRjs
- open Firefox
- go to FF addons and search for Greasemonkey or Tampermonkey
- install it
- Browse to unpkg.com/hocrjs/dist/hocr.user.js
- click "Install", it will install the script in your browser
First create an HOCR file with tesseract
Note: in this process will be more convenient to use a png or jpg input file, as the browser will not display a tiff.
You can use Imagemagick's $convert to save your PDF as JPG or PNG. The following options (density + quality) are recommended, to get a high res image file:
$ convert -density 300 filename.pdf -quality 100 filename.jpg
Run tesseract to produce a hocr (language and segmentation options can also be used)
$ tesseract filename.jpg filename -l eng hocr
You have got a file called: filename.hocr
View the HOCR file in Firefox
- change its extension from .hocr to .html
- open the .html file in firefox
Now hocr-viewer will automatically load.
Editing and correcting
hocrjs does not support editing :(
A solution would be to use FF inspector to change the content of the HOCR, but the HTML inspector changes are not saved, even if we are working with a local html file :((
So the only option is to do the editing in a plain text editor :(((
HOCR to PDF
It makes sense to use the position information and plain-text content to create a text-based PDF.
The tool hocr-pdf, which is an application from hocr-tools, is a possibility, but I only managed to create corrupted and empty PDFs.
The following thread suggests using pdfbeads or HocrConverter.
HocrConverter showed the best results, but failed when including (-I) the page image in the PDF:
> python HocrConverter/HocrConverter.py -I -i pg_0012.hocr -o pg_0012.pdf pg_0012.png

> python HocrConverter/HocrConverter.py -h
HocrConverter

Convert Files from hOCR to pdf

Usage:
  HocrConverter.py [-tIcbmnrV] [-q | -v | -vv] [-i <inputHocrFile>] [-f <inputTtfFile>] (-o <outputPdfFile>) [<inputImageFile>]...
  HocrConverter.py (-h | --help)

Options:
  -h --help             Show this screen.
  -t                    Make ocr-text visible
  -i <inputHocrFile>    hOCR input file
  -o <outputPdfFile>    pdf output
  -f <inputTtfFile>     use custom TTF font
  -I                    include images
  -c                    use full line text
  -b                    draw bounding boxes around ocr-text
  -n                    don't read images supplied in hocr-file
  -m                    do multiple pages in hocr and output pdf
  -r                    take hOCR-image sizes as reference for size of page
  -V                    vertical Inversion ( for ocropus: false, for tesseract: true )
  -q | -v | -vv         quiet ( only warnings and errors ) | verbose | very verbose = debug
HOCR to image file
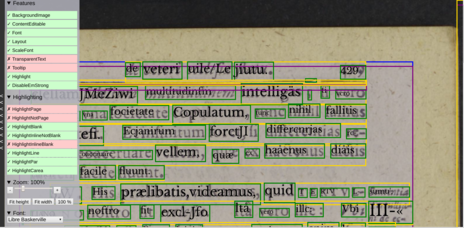
The following script is based on Natasha's erase_leastcommon.py as part of Special Issue #5.
The script goes through the following steps:
- it takes an input image (
scanimg:image.jpg) and hocr file (hocr:image.html) - it parses the hocr file with html5lib
- it checks the length of each word, and if it's under the set value (
exclude_words_shorter_then_this), it is not included in the output image - it puts the other words back on the output image
See an example below, the left image is the input image, the right the output image in which all words with less then 8 letters are excluded:


You need to have two python libraries installed:
pip3 install pillowpip3 install html5lib
from PIL import Image
import html5lib

def coordinates(attribute):
	"This extracts the box coordinates of words from an hocr / html element tree"
	r = attribute 	# 'title' is the word in the html tag
	r, c = r.split(";") 	# split the attribute into two sections
	r = r.split(" ")[1:] 	# split again and discard the elements which aren't useful
	r = [int(x) for x in r] # put coordinates into list as integers
	return r

def filternone(word_raw):
	"This checks if there is any word present"
	if word_raw is None:
		remove = None
		word = 'y'
	else:
		word = element.text.strip(',".!:;()')
	return word

#--------------------------------------------------------
# set the variables
allwords = []
scanimg = "pandoc-0.jpg"
hocr = "pandoc.html"
exclude_words_shorter_then_this = 8

#--------------------------------------------------------
# start processing the input image (scanimg)
input_image = Image.open(scanimg)
output_image = Image.new("RGB", input_image.size, (255, 255, 255))

# open corresponding hocr file
hocr_file = open(hocr)
print("---")
print ("reading scanned image:", scanimg)
print("---")

# parse the hocr html file
hocr_html = html5lib.parse(hocr_file, namespaceHTMLElements=False)

#--------------------------------------------------------
# loop through every word in hocr file to analyse words
for element in hocr_html.findall(".//span[@class='ocrx_word']"):
	word = filternone(element.text)

	if len(word) < exclude_words_shorter_then_this:
		print("not including:", word)
	else:
		print("    including:", word)
		allwords.append(word)

# print ("allwords:", allwords)
print("---")

#--------------------------------------------------------
# loop through every word in hocr file to extract coordinates
# then paste the words into output image
for element in hocr_html.findall(".//span[@class='ocrx_word']"):
	word = filternone(element.text)
	coords = coordinates(element.attrib['title'])
	word_image = input_image.crop(coords)

	if word in allwords:
		# add/"paste" the word to the image
		output_image.paste(word_image, (coords[0], coords[1], coords[2], coords[3]))
	else:
		# add/"paste" a white rectangle instead
		output_image.paste((255, 255, 255), (coords[0], coords[1], coords[2], coords[3]))

#--------------------------------------------------------
# save image

output_filename_base = scanimg.replace(".jpg", "")
output_filename = f"{ output_filename_base }-erase.jpg"
output_image.save(output_filename)
print (f"saved:", output_filename)
print("---")
Creating new fonts: Training
New fonts can be added to Tesseract through a training process.
Fonts are
The process of training for v.3 is complicated, but here are links for a few resources that can guide you in the process
- Tessearct (extensive) documentation on Training https://github.com/tesseract-ocr/tesseract/wiki/TrainingTesseract
- Tutorial: Adding New Fonts to Tesseract 3 OCR Engine http://michaeljaylissner.com/posts/2012/02/11/adding-new-fonts-to-tesseract-3-ocr-engine/
- Tutorial: A Guide on OCR with tesseract 3.03 https://www.joyofdata.de/blog/a-guide-on-ocr-with-tesseract-3-03/</ref>
- Tutorial: How to prepare training files for tessearct-orc and improve character recognition http://pretius.com/how-to-prepare-training-files-for-tesseract-ocr-and-improve-characters-recognition/
- Tutorial: Training Tesseract OCR for a New Font and Input Set on Mac https://medium.com/@sathishvj/training-tesseract-ocr-for-a-new-font-and-input-set-on-mac-7622478cd3a1
Tesseract needs to know about different shapes of the same character by having different fonts separated explicitly.
tessdata/ dir, where data files can be found, can be found on Debian at /usr/share/tesseract-ocr/tessdata
If the dir happens to be located elsewhere you can use the following commands to find it:
cd /
sudo find -type d -name "tessdata"
box output
The box file output consists of a plain-textfile containing x,y coordinates of each letter it found along with what letter it thinks it is
In cases where the input is a standard text, with a standard font, the result are not bad.
But when dealing with unusual fonts or hand-written scripts Tesseract has the possibility to train it.
Tesseract needs a 'box' file to go with each training image. The box file is a text file that lists the characters in the training image, in order, one per line, with the coordinates of the bounding box around the image.
https://github.com/tesseract-ocr/tesseract/wiki/Training-Tesseract-%E2%80%93-Make-Box-Files

convert -density 300 wafer.pdf -depth 8 -strip -background white -alpha off wafer.tiff
tesseract wafer.tiff wafer makebox
Edit the box file with [moshpytt https://code.google.com/archive/p/moshpytt/]
./moshpytt.py

Boxmaker is a JavaScript online box editor
Artistic research
Reverse OCR by http://reverseocr.tumblr.com/
Kindle Scanner by Peter Purgathofer
We are human beings! by Silvio Lorusso

tesseract-ocr front-ends gImageReader: Debian install
sudo aptitude install gimagereader
HOCR
- hocr-tools - python library
- HOCR reader (javascript)
- Converting hOCR to PDF: HocrConverter (python script)