User:Alice/XPPL
Stacks
Theoretical approach
Implementation
Conected research
Git branches
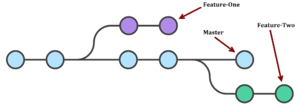
When you create a branch within a project in git, you diverge from the main line of development and continue working on a a separate line without affecting the main line. A branch is a movable pointer to one of the snapshots of your project (a commit).
Setting up
To create a new branch, you first have to go to the folder in which you cloned the git repository.
- Check your current status and branch:
git status
git branch -v
- To create a new branch:
git branch name_of_branch

or

git checkout -b name_of_branch

which creates a new branch and moves you inside it

otherwise, to go inside your new branch

git checkout name_of_branch
Now you can start working on your new branch and commiting to it.
Merging the branches
First, move to the main branch and get the latest version, in case other people have pushed their commits to it in the meantime.
checkout master
to see the difference between your version of the master branch and the current version:
git status
git diff

now pull, and resolve conflicts if there are any:

pull origin master
In order to merge both branches, you can use the rebase command to put your latest commits on top of all other commits in the master branch. Then, fix any conflicts that might occur in your text editor, add the changed files, commit, merge and push.
git checkout name_of_branch
git rebase master

fix conflicts

git add name_of_changed_files

git checkout master

git merge name_of_branch

git push origin master

