
User:Eleni/Biodata Sonification: Difference between revisions
| Line 61: | Line 61: | ||
==Process== | ==Process== | ||
===Setting up the Adafruit=== | ===Setting up the Adafruit ESP32S3=== | ||
[[File:Littleguy esp.jpeg|thumb|left|253x253px|Little guy!]] First thing I did was plug in the Adafruit to my computer using a usb-c cable. The little led lights anf the charging indicator turned on; it's alive!! I downloaded Arduino IDE for Windows and when I opened it it instantly recognized my little friend and got to work setting it up. | [[File:Littleguy esp.jpeg|thumb|left|253x253px|Little guy!]] First thing I did was plug in the Adafruit to my computer using a usb-c cable. The little led lights anf the charging indicator turned on; it's alive!! I downloaded Arduino IDE for Windows and when I opened it it instantly recognized my little friend and got to work setting it up. InWhen in the IDE, I looked up the ESP32 Boards in the Boards Manager and it looks like we're good to go! | ||
'''FIVE HOURS LATER''' '''UPDATE;''' We were ''not'' good to go... Since the board came with no documentation (or i threw it out without realizing) I had to go through much research to actually boot the ESP and code on it. I ended up using [https://learn.adafruit.com/adafruit-esp32-s3-feather/ this tutorial from the official site]. So far, I have manipulate the led light, which is a satisfying first step! | |||
==References== | ==References== | ||
<references /> | <references /> | ||
Revision as of 21:53, 10 October 2024
Holding myself accountable ✨
This is the beginning of a new project; I am creating my own Biodata Sonification Device using this tutorial, [1][2] while also documenting my process on here! I know next to nothing about MIDI and Galvanic Conductance, but we are experimenting (fucking around and finding out)
Check out some example results and get excited like me! here & here
Latest Update:
08/10 - Parts have been purchased 🤞🤞
10/10 - Most of it arrived, forgot to order two out of three capacitors and the electrode things are coming from china oops😣
List of Tools

From what I've gathered from the tutorial I need:
- 3.5mm jack
- Blue (?) Capacitor 4700pf
- Resistor (3.9K)
- 555 Timer IC (8pin)
- 5 LEDs (red, orange, green, blue, white)
- 10 Ohm Resistor
- 11 Jumper Wires
- Solderless Breadboard
- CR2032 Button Battery 3 volts
- Adafruit Feather ESP32
- microUSB Cable
What is Biodata Sonification??
Sonification is the use of non-speech audio to convey information or perceptualize data. Auditory perception has advantages in temporal, spatial, amplitude, and frequency resolution that open possibilities as an alternative or complement to visualization techniques. [3]
Biodata Sonification (or Bio-sonification) is a process to translate complex real-time sensor data into musical notes and controls, exploring auditory sensory modality to provide insights into invisible phenomenon. [4]
“Bio-sonification,” basically means using technology to turn the bio-rhythms of living organisms into sound. -
Some extra info for components
Capacitor
(In Greek: Πυκνωτής) In electrical engineering, a capacitor is a device that stores electrical energy by accumulating electric charges on two closely spaced surfaces that are insulated from each other. The capacitor was originally known as the condenser,[1] a term still encountered in a few compound names, such as the condenser microphone. It is a passive electronic component with two terminals.
The utility of a capacitor depends on its capacitance. While some capacitance exists between any two electrical conductors in proximity in a circuit, a capacitor is a component designed specifically to add capacitance to some part of the circuit.

Resistor

(In Greek: Αντιστάτης) The resistor is a passive electrical component that creates resistance in the flow of electric current. In almost all electrical networks and electronic circuits they can be found. The resistance is measured in ohms (Ω). An ohm is the resistance that occurs when a current of one ampere (A) passes through a resistor with a one volt (V) drop across its terminals. The current is proportional to the voltage across the terminal ends. This ratio is represented by Ohm’s law:
R = V/I
The resistance value and tolerance are indicated with several colored bands around the component body. This marking technique of electronic components was already developed in the 1920s. Printing technology was still not far developed, what made printed numerical codes too difficult on small components. Nowadays, the color code is still used for most axial resistors up to one watt. In the figure above, an example is shown with four color bands. In this example the two first bands determine the significant digits of the resistance value, the third band is the multiplying factor and the fourth band gives the tolerance. Each color represents a different number and can be looked up in a resistor color code chart or using a resistor color code calculator. [5]
For this project we need:
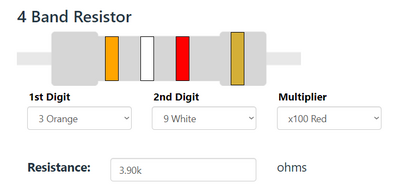
Orange / White / Red
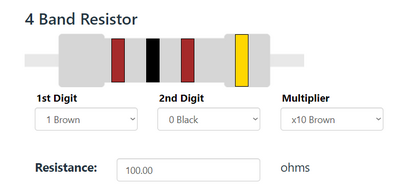
Brown / Black / Brown Resistor


555 Timer
The 555 timer IC is an integrated circuit used in a variety of timer, delay, pulse generation, and oscillator applications. [6]
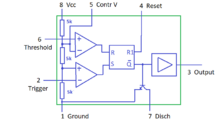
Block Diagram
Little Guy


Process
Setting up the Adafruit ESP32S3

First thing I did was plug in the Adafruit to my computer using a usb-c cable. The little led lights anf the charging indicator turned on; it's alive!! I downloaded Arduino IDE for Windows and when I opened it it instantly recognized my little friend and got to work setting it up. InWhen in the IDE, I looked up the ESP32 Boards in the Boards Manager and it looks like we're good to go!
FIVE HOURS LATER UPDATE; We were not good to go... Since the board came with no documentation (or i threw it out without realizing) I had to go through much research to actually boot the ESP and code on it. I ended up using this tutorial from the official site. So far, I have manipulate the led light, which is a satisfying first step!
References
- ↑ https://www.instructables.com/Biodata-Sonification/
- ↑ https://electricityforprogress.com/biodata-breadboard-kit/
- ↑ https://en.wikipedia.org/wiki/Sonification
- ↑ https://www.toscateran.com/bio-sonification
- ↑ https://eepower.com/resistor-guide/resistor-fundamentals/what-is-a-resistor/#
- ↑ https://en.wikipedia.org/wiki/555_timer_IC