Reading Wii Nunchuck data in Python: Difference between revisions
No edit summary |
No edit summary |
||
| Line 1: | Line 1: | ||
[[Category: Cookbook]] | |||
'''Brief description:''' | '''Brief description:''' | ||
Use the Wii Nunchuck to draw in the terminal and turn the drawing into a SVG | Use the Wii Nunchuck to draw in the terminal and turn the drawing into a SVG | ||
Revision as of 15:15, 1 December 2011
Brief description:
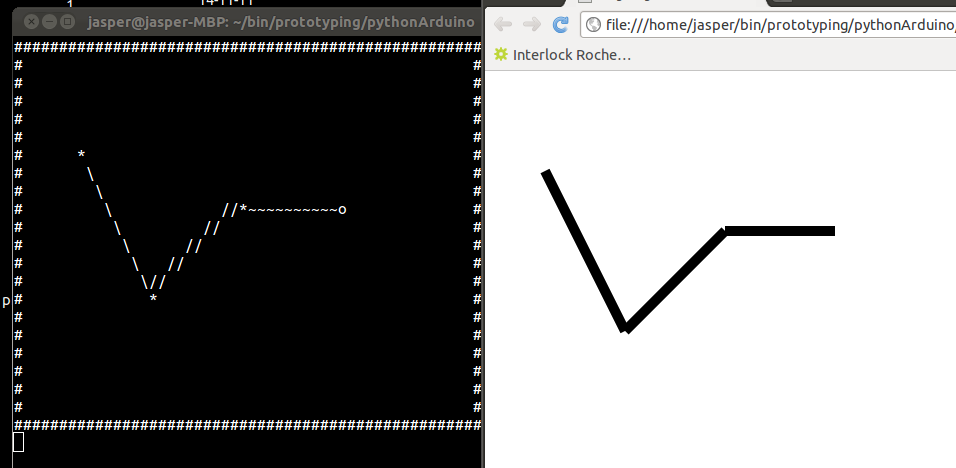
Use the Wii Nunchuck to draw in the terminal and turn the drawing into a SVG
Since I installed Linux I use the terminal a lot. I really like how you can use something text based and really basic to perform all kinds of complex tasks.
After messing with SVG for a bit I thought it might be interesting to use the text based terminal as the interface to a SVG generating script. Also, I wanted to see how I could use the terminal together with an Arduino, so I used one to connect my Python script too a Wii controller (Nunchuck), which is used as input for the script.
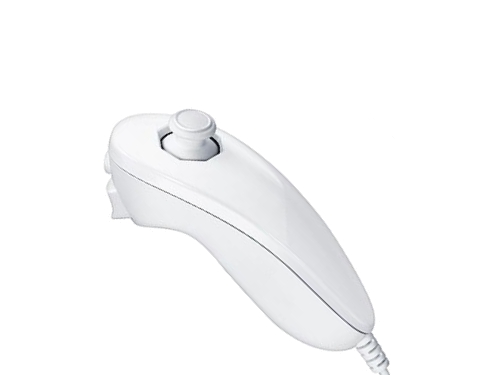
The Nunchuck's joystick controls the cursor, the Z (large) button lets jou draw lines (press and hold while moving around) and the c button creates and shows the SVG. Using the WiiChuck class the arduino reads the data which is then send to Python though a serial connection. To connect the Nunchuck to the Arduino without cutting the cable I used the Wiichuck adapter. Both the class and the adapter are available here.
[Disclaimer] Since I wrote the code from scratch and added 'features' as I went along I bet it's far from optimized. But it seems to do the job.
Python code
#=========================================================
# Import libs and set basic vars
#=========================================================
import serial, os, math

width, height = 50, 20
xpos, ypos = 0, 0
sx, sy = -1, -1
zbut, prevZbut, cbut = 0, 0, 0
cursorChar, prevCursorChar = "o", ""
svgScale = 10.0
svgHeightCorrection = 2

theScreen = [] #will hold all of the 'pixels'
fullRow = "" # the line of #s for use at the top and bottom
for x in range(0, width+2):
    fullRow += "#"

#initiate the screen arrays
for y in range(0, height):
    xlist = []
    for x in range(0, width):
        xlist.append(" ")
    theScreen.append(xlist)

svgOut = ""
#=========================================================
# function to draw the arrays to the screen
#=========================================================
def display():
    global theScreen
    global cursorChar
    global xpos
    global ypos

    prevCursorChar = theScreen[ypos][xpos]
    theScreen[ypos][xpos] = cursorChar
    os.system("clear")
    print fullRow
    for y in theScreen:
        printLine = "#"
        for x in y:
            printLine += str(x)
        print printLine+"#"
    print fullRow
    theScreen[ypos][xpos] = prevCursorChar

#=========================================================
# function to draw a line
#=========================================================
def drawLine(x1, y1, x2, y2, useInSvg):
    global theScreen
    global svgOut
    global svgScale
    global svgHeightCorrection

    bx1, by1, bx2, by2 = int(x1), int(y1), int(x2), int(y2)

    x1 = max(0, min(x1, width))
    x2 = max(0, min(x2, width))
    y1 = max(0, min(y1, height))
    y2 = max(0, min(y2, height))

    d = math.atan2(y2-y1, x2 - x1)*180/math.pi #d = direction
    d2 = d
    if d2 < 0:
        d2 = (360-abs(d2))
    dist = math.floor(math.sqrt((x1-x2)*(x1-x2) + (y1-y2)*(y1-y2)))
    lineChar = "*"
    if (d2 >= 360-22.53 or d2 < 22.5) or (d2>=157.5 and d2<202.5):
       lineChar = "~"
    elif (d2 >= 22.5 and d2 < 67.5) or (d2>=202.5 and d2<247.5):
       lineChar = "\\"
    elif (d2>=67.5 and d2<112.5) or (d2>=247.5 and d2<292.5):
       lineChar = "|"
    elif (d2>=112.5 and d2<157.5) or (d2>=292.5 and d2<337.5):
       lineChar = "/"

    step = 0
    while(step < dist):
        x1 += math.cos(d*math.pi/180)
        y1 += math.sin(d*math.pi/180)
        if x1>width:
            x1 = width-1
            x2 = width-1
        elif x1<0:
            x1 = 0
            x2 = 0
        if y1>height:
            y1 = height-1
            y2 = height-1
        elif y2<0:
            y1 = 0
            y2 = 0
        drawY = int(math.floor(y1))
        drawX = int(math.floor(x1))
        if drawY < len(theScreen):
            if drawX < len(theScreen[drawY]):
                theScreen[drawY][drawX] = lineChar
        step = step + 1
    theScreen[by1][bx1], theScreen[by2][bx2] = "*", "*"

    if useInSvg==1:
        svgOut = svgOut + """<line x1="{0}" y1="{1}" x2="{2}" y2="{3}"
    style="stroke:rgb(0,0,0);stroke-width:{4}"/>""".format(bx1*svgScale, by1*(svgScale*svgHeightCorrection), bx2*svgScale, by2*(svgScale*svgHeightCorrection), svgScale)

def drawEllipse(x, y):
    global svgOut
    print "at: "+str(x)+", "+str(y)
    svgOut = svgOut + """<ellipse cx="{0}" cy="{1}" rx="{2}" ry="{2}"
  style="fill:black;"/>""".format(float(x)*2*svgScale, float(y)*svgScale, svgScale/2)

#=========================================================
# Save image, open and quit
#=========================================================
def saveOpenAndQuit():
    global svgOut
    global width
    global height
    global svgScale
    svgOut = """<svg xmlns="http://www.w3.org/2000/svg" version="1.1" width="{0}" height="{1}">""".format(svgScale*width, svgScale*(height*svgHeightCorrection)) + svgOut
    svgOut = svgOut + "</svg>"

    fo = open("image.svg", "wb")
    fo.write( svgOut);
    fo.close()
    os.system("google-chrome image.svg &")

#=========================================================
# Main loop
#=========================================================
loop = 0
ser = serial.Serial('/dev/ttyACM0', 19200)
while 1:
    loop = loop + 1
    serialData = ser.readline()
    serialData = serialData.replace("\r\n", "")
    dataList = serialData.split(',')

    if len(dataList)==6:
        prevZbut = zbut
        accx = float(dataList[0])
        accy = float(dataList[1])
        zbut = float(dataList[2])
        cbut = float(dataList[3])
        joyx = float(dataList[4])
        joyy = float(dataList[5])

        #move cursor around
        if joyx>150:
            xpos = xpos + 1
        elif joyx<100:
            xpos = xpos - 1

        if joyy>150:
            ypos = ypos - 1
        elif joyy<100:
            ypos = ypos + 1

        xpos = max(0, min(xpos, width-1))
        ypos = max(0, min(ypos, height-1))

        #remember previous char on cursor location
        prevCursorChar = theScreen[ypos][xpos]

        if cbut==1:
            saveOpenAndQuit()
        cursorChar = "o"

        if zbut==1 and prevZbut==0:#click, starting to draw
            sx, sy = xpos, ypos
            theScreen[ypos][xpos] = "*"
            cursorChar = "x"
            display()
        elif zbut==1 and prevZbut==1:#dragging around
            cursorChar = "*"
            #somehow I need to iterate over the tempScreen and theScreen arrays
            #instead of just copying them with .extend
            tempScreen = []
            for y in range(0, height):
                xlist = []
                for x in range(0, width):
                    xlist.append(theScreen[y][x])
                tempScreen.append(xlist)

            drawLine(sx, sy, xpos, ypos, 0)
            display()
            theScreen = []
            for y in range(0, height):
                xlist = []
                for x in range(0, width):
                    xlist.append(tempScreen[y][x])
                theScreen.append(xlist)

        elif zbut==0 and prevZbut==1:#released
            theScreen[ypos][xpos] = "*"
            cursorChar = "x"
            if sx==xpos and sy==ypos:
                drawEllipse(xpos, ypos)
            else:
                drawLine(sx, sy, xpos, ypos, 1)
            sx, sy = -1, -1
            display()

        elif zbut==0 and prevZbut==0:#doing nuthin'
            cursorChar = "o"
            display()
Arduino code
#include <Wire.h>
#include "nunchuck_funcs.h"

int loop_cnt=0;

byte accx,accy,zbut,cbut,joyx,joyy;
int ledPin = 13;


void setup()
{
  Serial.begin(19200);
  nunchuck_setpowerpins();
  nunchuck_init(); // send the initilization handshake
}

void loop()
{
  if( loop_cnt > 100 ) { // every 100 msecs get new data
    loop_cnt = 0;

    nunchuck_get_data();
    //nunchuck_print_data();

    accx  = nunchuck_accelx(); // ranges from approx 70 - 182
    accy  = nunchuck_accely(); // ranges from approx 65 - 173
    zbut = nunchuck_zbutton();
    cbut = nunchuck_cbutton();
    joyx = nunchuck_joyx();
    joyy = nunchuck_joyy();

    Serial.print((byte)accx,DEC);
    Serial.print(",");
    Serial.print((byte)accy,DEC);
    Serial.print(",");
    Serial.print((byte)zbut,DEC);
    Serial.print(",");
    Serial.print((byte)cbut,DEC);
    Serial.print(",");
    Serial.print((byte)joyx,DEC);
    Serial.print(",");
    Serial.print((byte)joyy,DEC);
    Serial.println();
  }
  loop_cnt++;
  delay(1);
}


