Arduino101: Difference between revisions
m (→Hardware) |
m (→Hardware) |
||
| Line 32: | Line 32: | ||
== Hardware == | == Hardware == | ||
To program (or flash) your arduino, you need to connect it to your computer (using USB). Connect your Arduino, open the Arduino IDE and see if your board appears:<br> | To program (or flash) your arduino, you need to connect it to your computer (using USB). Connect your Arduino, open the Arduino IDE and see if your board appears:<br><br> | ||
[[File:Arduino-uno-origiginal-serial.png|frameless]]<br> | [[File:Arduino-uno-origiginal-serial.png|frameless]]<br> | ||
''Screenshot showing original Arduino UNO connected to serial port.'' | ''Screenshot showing original Arduino UNO connected to serial port.'' | ||
Important settings | '''Important settings'''<br> | ||
Board: Select the correct Arduino AVR Board from the list (UNO or Nano in our case). Note in the case of the Nano, there are 2 different chips, 328p and 328p (Old bootloader). <br> | ''Board'': Select the correct Arduino AVR Board from the list (UNO or Nano in our case). Note in the case of the Nano, there are 2 different chips, 328p and 328p (Old bootloader). <br><br> | ||
Port: Select the right serial port to upload your sketch to:<br> | ''Port'': Select the right serial port to upload your sketch to:<br> | ||
linux: /dev/ttyACM# or /dev/ttyUSB (# = number)<br> | linux: /dev/ttyACM# or /dev/ttyUSB (# = number)<br> | ||
osx: /dev/cu.wchusbserial# or dev/cu.usbmodem# (# = number) <br> | osx: /dev/cu.wchusbserial# or dev/cu.usbmodem# (# = number) <br> | ||
win: COM# (# = number) | win: COM# (# = number)<br> | ||
<br> | <br> | ||
[[File:Arduino-nano-clone-serial.png|frameless]]<br> | [[File:Arduino-nano-clone-serial.png|frameless]]<br> | ||
''Screenshot showing clone Arduino Nano connected to serial port.'' | ''Screenshot showing clone Arduino Nano connected to serial port.'' | ||
<br> | <br><br> | ||
[[File:Arduino-bootloader.png|frameless]]<br> | [[File:Arduino-bootloader.png|frameless]]<br> | ||
''Screenshot showing clone Arduino Nano 'bootloader' options'' | ''Screenshot showing clone Arduino Nano 'bootloader' options'' | ||
Revision as of 15:34, 30 September 2019
Arduino is umbrella term for a collection of programmable microcontrollers. It covers both a physical device and an integrated development environment (IDE) that allows you to write, review, debug and upload code to your microcontroller. The Arduino IDE supports a wide variety of microcontrollers from different manufacturers with equally varying specifications (ATMEL, ESP32, ESP8266, etc). The original Arduino project takes a bare 8 bit microcontroller and adds an USB port (+ usb-to-serial converter by FTDI), voltage regulators, input/output header pins for plug and play experience. It's schematics are open source and allowed the proliferation of many varieties and clones. It is also very easy (and cheap) to make your own 'Arduino' clone on a breadboard with a handful of components
Software
NOTE: Arduino clones need a special driver, see below.
Graphical
All Platforms (Windows/OSX/Linux) >> Download the IDE here: https://www.arduino.cc/en/Main/Software
Installation OSX Unpack, mount, drag to applications folder
Installation Win Run installer, follow installation procedure.
Installation Linux https://www.instructables.com/id/Install-Arduino-IDE-182-on-Linux/
Command Line
First, install the Graphical IDE, then:
https://github.com/sudar/Arduino-Makefile
See also: https://git.xpub.nl/XPUB/special-issue-x/src/branch/master/templates/arduino-make and https://git.xpub.nl/XPUB/special-issue-x/src/branch/master/templates/bare-make
Driver
WIN+OSX:http://sparks.gogo.co.nz/ch340.html OSX Mojave has the driver built in. Recent Linux flavours have the driver built in.
Web
https://www.circuito.io/ https://create.arduino.cc/editor
Hardware
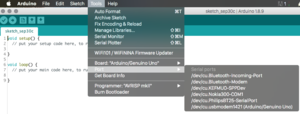
To program (or flash) your arduino, you need to connect it to your computer (using USB). Connect your Arduino, open the Arduino IDE and see if your board appears:

Screenshot showing original Arduino UNO connected to serial port.
Important settings
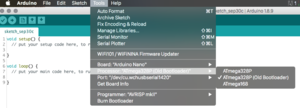
Board: Select the correct Arduino AVR Board from the list (UNO or Nano in our case). Note in the case of the Nano, there are 2 different chips, 328p and 328p (Old bootloader).
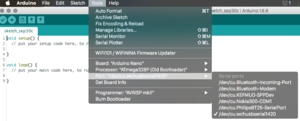
Port: Select the right serial port to upload your sketch to:
linux: /dev/ttyACM# or /dev/ttyUSB (# = number)
osx: /dev/cu.wchusbserial# or dev/cu.usbmodem# (# = number)
win: COM# (# = number)

Screenshot showing clone Arduino Nano connected to serial port.

Screenshot showing clone Arduino Nano 'bootloader' options
Sketches
Anatomy of a sketch
Examples
Debugging
Output
Input
Arduino + Processing
Using Serial for Visualising, also add cli way (for more flexible/modular approach(promoting approaches not apps))!
Prototyping
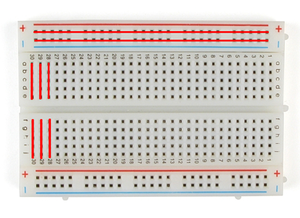
Breadboard

Solderless breadboard, (hand drawn) red lines indicate interconnected contacts
Input
Voltage divider
Output
Protect ya Led
Considerations
Clones vs Real Deal
Clones use inferior usb to serial chips, voltage regulators and non removable atmel microcontrollers. With buying an original Arduino you support the development and community (needs proof ;p).
