Archive Protocol/Video: Difference between revisions
(→TO DO) |
No edit summary |
||
| Line 64: | Line 64: | ||
</pre> | </pre> | ||
== TO DO | == Lacie 2big Thunderbolt == | ||
===Modify the RAID mode=== | |||
To be able to use different interchange stand-alone SATA drives, the Lacie chassis needs to be be set in | |||
'''JBOD''' (just a bunch of drives). | |||
==JBOD== | |||
From http://manuals.lacie.com/en/manuals/2big-tbt2/raid | |||
http://manuals.lacie.com/_media/products/2big-tbt2/ill/ill-2big-tbt2-raid03.png?w=400&tok=b1df61 | |||
Set Lacie 2big to JBOD by: | |||
* Unmount the LaCie 2big's volumes from your computer (see Unmounting Your Drive). | |||
* Power off the device using the LED button (see LEDs and LED Power Button). | |||
* Remove the side panel for access to the RAID selection and confirmation buttons (see Getting Connected). The power supply must remain connected to the device. | |||
* Use the sharp end of the RAID selection tool to press and hold down the SELECT button. | |||
* Without releasing the SELECT button, turn on the product by pressing the front LED button. | |||
* All the RAID mode LEDs flash momentarily before the LED for the current RAID mode blinks on its own. Using the RAID selection tool, press the SELECT button to toggle between the modes. | |||
* When the LED for your preferred RAID mode is lit, use the RAID selection tool to press the CONFIRM button. IMPORTANT: Press CONFIRM within five seconds or the selection mode turns off and the configuration reverts to the current RAID. | |||
* Your computer prompts you to initialize the new RAID volume. You must initialize and format the hard drives for use with your computer (see Formatting). | |||
= TO DO = | |||
* Change filenames so they they are all proceeded by the parent folder name. | * Change filenames so they they are all proceeded by the parent folder name. | ||
e.g. | e.g. | ||
Latest revision as of 16:16, 7 December 2015
offline video archive - How is the video archive structured
Where
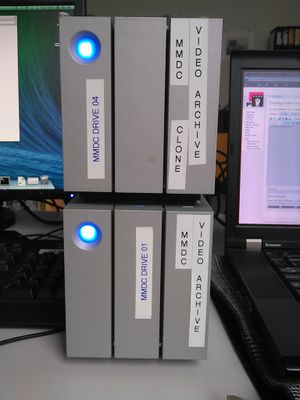
The MMDC Video Archive is stored in MMDC DRIVE 01
And cloned to MMDC DRIVE 04
What
The Archive stores all the video documentation from MMDC, namely:
- Gradshow (showreel)
- Y1 Show
- Symposium
How
The folders in the archive follow name the convention:
MMDC_EVENT_YEAR_NAME-OF-EVENT
And inside they are further divided into media:
As for example:
├── MMDC_SHOWREEL_2012_EXCEPTION_HANDLING
├── PHOTO
│   │   ├── Amy
│   │   ├── Cola
│   │   ├── Daan
│   │   ├── Dusan
│   │   ├── Fako
│   │   ├── Inge
│   │   ├── Laura
│   │   ├── Laurier
│   │   ├── Lena
│   │   ├── Lieven
│   │   ├── Luis
│   │   ├── Quinten
│   │   ├── Sebastian
│   │   └── Tomas
│   └── VIDEO
│       ├── Amy
│       ├── Cola
│       ├── Daan
│       ├── Dusan
│       ├── Laura
│       ├── Laurier
│       ├── Lena
│       ├── Lieven
│       ├── Luis
│       ├── Quinten
│       ├── Sebastian
│       └── Tomas
├── MMDC_SHOWREEL_2013_NEWS_FROM_NOWHERE
│   ├── PHOTO
│   └── VIDEO
├── MMDC_SHOWREEL_2014_UNLIKED
│   └── VIDEO
├── MMDC_SHOWREEL_2015_TEMPED_BY_TOMORROW
│   ├── PHOTO
│   └── VIDEO
└── MMDC_Y1_SHOW_2015_ENCYCLOPEDIA-MEDIA-OBJECTS_V2
    ├── PHOTOS
    └── VIDEOS
Lacie 2big Thunderbolt
Modify the RAID mode
To be able to use different interchange stand-alone SATA drives, the Lacie chassis needs to be be set in JBOD (just a bunch of drives).
JBOD
From http://manuals.lacie.com/en/manuals/2big-tbt2/raid
http://manuals.lacie.com/_media/products/2big-tbt2/ill/ill-2big-tbt2-raid03.png?w=400&tok=b1df61
Set Lacie 2big to JBOD by:
- Unmount the LaCie 2big's volumes from your computer (see Unmounting Your Drive).
- Power off the device using the LED button (see LEDs and LED Power Button).
- Remove the side panel for access to the RAID selection and confirmation buttons (see Getting Connected). The power supply must remain connected to the device.
- Use the sharp end of the RAID selection tool to press and hold down the SELECT button.
- Without releasing the SELECT button, turn on the product by pressing the front LED button.
- All the RAID mode LEDs flash momentarily before the LED for the current RAID mode blinks on its own. Using the RAID selection tool, press the SELECT button to toggle between the modes.
- When the LED for your preferred RAID mode is lit, use the RAID selection tool to press the CONFIRM button. IMPORTANT: Press CONFIRM within five seconds or the selection mode turns off and the configuration reverts to the current RAID.
- Your computer prompts you to initialize the new RAID volume. You must initialize and format the hard drives for use with your computer (see Formatting).
TO DO
- Change filenames so they they are all proceeded by the parent folder name.
e.g.
MMDC_SHOWREEL_2012_EXCEPTION_HANDLING_Amy.mov
- Author should also have full name

