User:E.zn/rpi: Difference between revisions
(Created page with "v") |
|||
| (12 intermediate revisions by the same user not shown) | |||
| Line 1: | Line 1: | ||
<div style="font-family:monospace; font-size:14px; background-color:#AEC0A8; padding:10px;"> | |||
<div style="float:right; border:none; background:none; padding-right:3%"> | |||
__TOC__ | |||
</div> | |||
<br clear="all"> | |||
<br> | |||
<br> | |||
:::::::::::::::::::::::Raspberry Pi is a single-board computer | |||
<div style="width:85%"> | |||
===___________________________________SD card=== | |||
<br> | |||
====_ _ _ _ _ Download .img==== | |||
<br> | |||
:: Download RPi image from [https://www.raspberrypi.org/software/operating-systems/#raspberry-pi-os-32-bit raspberrypi.org] either manually or using <code style="background-color:#DDE3DB; border-color:#DDE3DB; color:blue;">wget</code>. For instance, the latest release of Raspberry Pi OS Lite at the time of writing this is <code style="background-color:#DDE3DB; border-color:#DDE3DB; color:blue;">2021-01-11-raspios-buster-armhf-lite.zip</code> | |||
::<pre style="background-color:#E6E6E6; border-color:blue; color:red; width:90%">wget https://downloads.raspberrypi.org/raspios_lite_armhf/images/raspios_lite_armhf-2021-01-12/2021-01-11-raspios-buster-armhf-lite.zip</pre> | |||
====_ _ _ _ _ Verify Hash Key==== | |||
<br> | |||
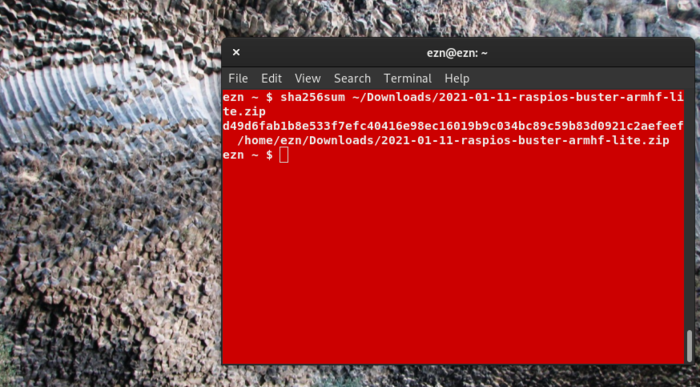
:: Hash key [ sha256 ] is provided on the website, next to the RPi image info. For <code style="background-color:#DDE3DB; border-color:#DDE3DB; color:blue;">2021-01-11-raspios-buster-armhf-lite.zip</code>, it's <code style="background-color:#DDE3DB; border-color:#DDE3DB; color:blue;">d49d6fab1b8e533f7efc40416e98ec16019b9c034bc89c59b83d0921c2aefeef</code>. | |||
::<pre style="background-color:#E6E6E6; border-color:blue; color:red; width:90%">sha256sum ~/Downloads/2021-01-11-raspios-buster-armhf-lite.zip</pre> | |||
::::::::[[File:RPi_1.png|700px]] | |||
<br clear=all> | |||
====_ _ _ _ _ Unzip==== | |||
<br> | |||
::<pre style="background-color:#E6E6E6; border-color:blue; color:red; width:90%">unzip 2021-01-11-raspios-buster-armhf-lite.zip</pre> | |||
====_ _ _ _ _ Check mounted devices==== | |||
<br> | |||
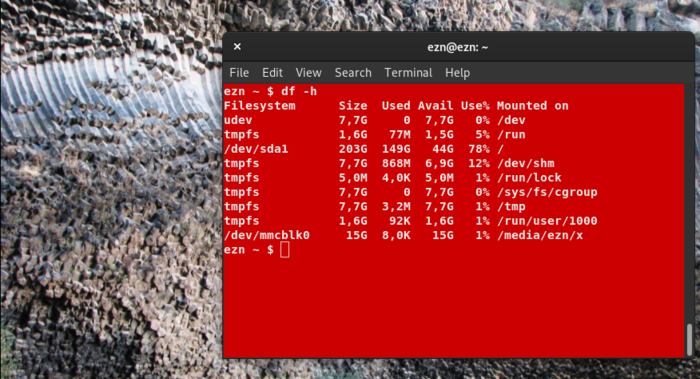
::When you have an SD card inserted in your laptop, it will show up as a partition[s] on the list of mounted devices : <code style="background-color:#DDE3DB; border-color:#DDE3DB; color:blue;">/dev/mmcblk0<#></code> [in my case: <code style="background-color:#DDE3DB; border-color:#DDE3DB; color:blue;">/dev/mmcblk0</code>] | |||
::<pre style="background-color:#E6E6E6; border-color:blue; color:red; width:90%">df -h</pre> | |||
::::::::[[File:RPi_2.png|700px]] | |||
<br clear=all> | |||
====_ _ _ _ _ Unmount==== | |||
<br> | |||
::Unmount the SD card partition[s] [in this case it's only <code style="background-color:#DDE3DB; border-color:#DDE3DB; color:blue;">/dev/mmcblk0</code>] | |||
::<pre style="background-color:#E6E6E6; border-color:blue; color:red; width:90%">umount /dev/mmcblk0</pre> | |||
====_ _ _ _ _ .img-to-SD==== | |||
<br> | |||
:: To write the image to the SD card, run the following command, but make sure <code style="background-color:#DDE3DB; border-color:#DDE3DB; color:blue;">of=</code> argument output is a correct device name, meaning the whole SD card and not one of its partitions! | |||
::<pre style="background-color:#E6E6E6; border-color:blue; color:red; width:90%">sudo dd bs=4M status=progress if=2021-01-11-raspios-buster-armhf-lite.img of=/dev/mmcblk0</pre> | |||
::<pre style="background-color:#E6E6E6; border-color:blue; color:red; width:90%">sudo sync</pre> | |||
====_ _ _ _ _ ssh file==== | |||
<br> | |||
::Create a file named <code style="background-color:#DDE3DB; border-color:#DDE3DB; color:blue;">ssh</code> in a boot partition | |||
::<pre style="background-color:#E6E6E6; border-color:blue; color:red; width:90%">cd /media/ezn/boot</pre> | |||
::<pre style="background-color:#E6E6E6; border-color:blue; color:red; width:90%">touch ssh</pre> | |||
::SD card is good to go. Insert the card in RPi before powering it on, and shutdown the Raspberry Pi before unplugging the card. | |||
===___________________________________RPi=== | |||
<br> | |||
::Default user: <code style="background-color:#DDE3DB; border-color:#DDE3DB; color:blue;">pi</code> | |||
::Default pwd: <code style="background-color:#DDE3DB; border-color:#DDE3DB; color:blue;">raspberry</code> | |||
::Default hostname: <code style="background-color:#DDE3DB; border-color:#DDE3DB; color:blue;">raspberrypi</code> | |||
====_ _ _ _ _ ssh==== | |||
<br> | |||
::Connect your RPi to a router with an ethernet cable. To try to ssh into it using the default credentials | |||
::<pre style="background-color:#E6E6E6; border-color:blue; color:red; width:90%">ssh pi@raspberrypi</pre> | |||
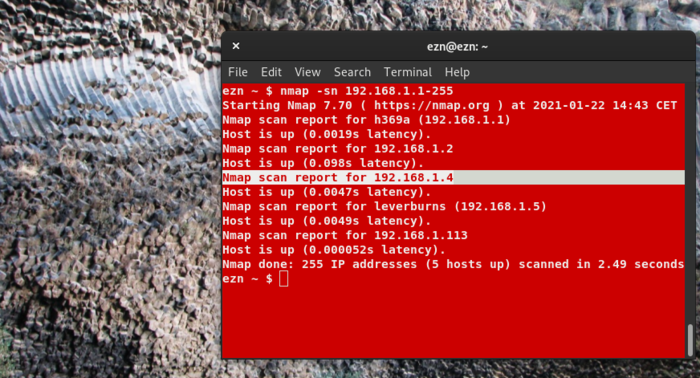
::If it didn't work, find the RPi IP address first. For this reason, scan your local network | |||
::<pre style="background-color:#E6E6E6; border-color:blue; color:red; width:90%">nmap -sn 192.168.1.1-255</pre> | |||
::::::::[[File:RPi_3.png|700px]] | |||
<br clear=all> | |||
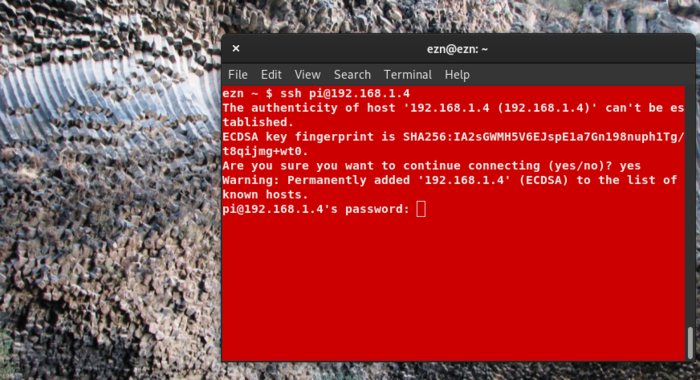
::I'm gonna use my RPi IP address [<code style="background-color:#DDE3DB; border-color:#DDE3DB; color:blue;">192.168.1.4</code>], and default username [<code style="background-color:#E6E6E6; border-color:#DDE3DB; color:blue;">pi</code>] and password [<code style="background-color:#DDE3DB; border-color:#DDE3DB; color:blue;">raspberry</code>] to ssh into it | |||
::<pre style="background-color:#E6E6E6; border-color:blue; color:red; width:90%">ssh pi@192.168.1.4</pre> | |||
::::::::[[File:RPi_4.png|700px]] | |||
<br clear=all> | |||
::In case you get the following message: <code style="background-color:#DDE3DB; border-color:#DDE3DB; color:blue;">Wi-Fi is currently blocked by rfkill</code> | |||
::<pre style="background-color:#E6E6E6; border-color:blue; color:red; width:90%">sudo rfkill unblock 0</pre> | |||
====_ _ _ _ _ Hostname==== | |||
<br> | |||
::To change the hostname from the default <code style="background-color:#DDE3DB; border-color:#DDE3DB; color:blue;">raspberrypi</code> to your desired one | |||
::<pre style="background-color:#E6E6E6; border-color:blue; color:red; width:90%">sudo raspi-config</pre> | |||
::Go to <code style="background-color:#DDE3DB; border-color:#DDE3DB; color:blue;">System Options</code>, select <code style="background-color:#DDE3DB; border-color:#DDE3DB; color:blue;">Hostname</code> and rename it. Then <code style="background-color:#DDE3DB; border-color:#DDE3DB; color:blue;"><Ok></code> and <code style="background-color:#DDE3DB; border-color:#DDE3DB; color:blue;"><Finish></code>. You'll be asked to reboot the RPi. | |||
====_ _ _ _ _ Add a user==== | |||
<br> | |||
::Switch to <code style="background-color:#DDE3DB; border-color:#DDE3DB; color:blue;">root</code> | |||
::<pre style="background-color:#E6E6E6; border-color:blue; color:red; width:90%">sudo -i</pre> | |||
::To add a user [<code style="background-color:#DDE3DB; border-color:#DDE3DB; color:blue;">ezn</code>, for instance] | |||
::<pre style="background-color:#E6E6E6; border-color:blue; color:red; width:90%">adduser ezn</pre> | |||
::You'll be prompted to set a password for this user | |||
::To add <code style="background-color:#DDE3DB; border-color:#DDE3DB; color:blue;">ezn</code> to a sudo group | |||
::<pre style="background-color:#E6E6E6; border-color:blue; color:red; width:90%">adduser ezn sudo</pre> | |||
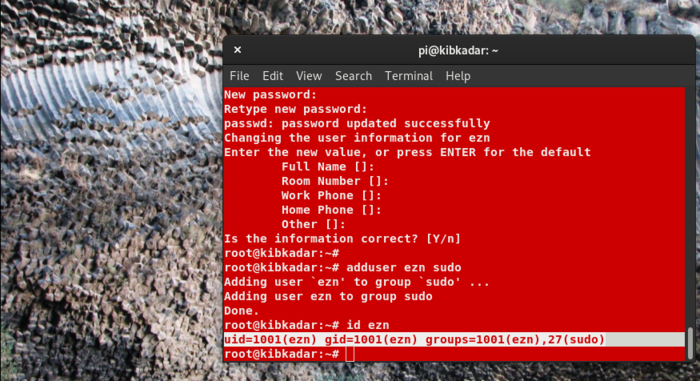
::To check if <code style="background-color:#DDE3DB; border-color:#DDE3DB; color:blue;">ezn</code> is indeed sudo | |||
::<pre style="background-color:#E6E6E6; border-color:blue; color:red; width:90%">id ezn</pre> | |||
::If <code style="background-color:#DDE3DB; border-color:#DDE3DB; color:blue;">ezn</code> is a sudo user, the command should output <code style="background-color:#DDE3DB; border-color:#DDE3DB; color:blue;">27(sudo)</code> at the end of the line, after <code style="background-color:#DDE3DB; border-color:#DDE3DB; color:blue;">uid</code>, <code style="background-color:#DDE3DB; border-color:#DDE3DB; color:blue;">gid</code> and <code style="background-color:#DDE3DB; border-color:#DDE3DB; color:blue;">groups</code>. | |||
::::::::[[File:RPi_5.png|700px]] | |||
<br clear=all> | |||
::To switch to a specific user | |||
::<pre style="background-color:#E6E6E6; border-color:blue; color:red; width:90%">sudo su - ezn</pre> | |||
====_ _ _ _ _ Remove default pi user ==== | |||
<br> | |||
::Since during the configuration, we initially logged in as <code style="background-color:#DDE3DB; border-color:#DDE3DB; color:blue;">pi</code>, we need to log out from it first and then delete it. So, run <code style="background-color:#DDE3DB; border-color:#DDE3DB; color:blue;">logout</code> or <code style="background-color:#DDE3DB; border-color:#DDE3DB; color:blue;">exit</code> until you're completely out and then ssh back into RPi as <code style="background-color:#DDE3DB; border-color:#DDE3DB; color:blue;">ezn</code> | |||
::<pre style="background-color:#E6E6E6; border-color:blue; color:red; width:90%">ssh ezn@192.168.1.4</pre> | |||
::<pre style="background-color:#E6E6E6; border-color:blue; color:red; width:90%">sudo -i</pre> | |||
::<pre style="background-color:#E6E6E6; border-color:blue; color:red; width:90%">deluser pi</pre> | |||
::To check a list of users | |||
::<pre style="background-color:#E6E6E6; border-color:blue; color:red; width:90%">cut -d: -f1 /etc/passwd</pre> | |||
====_ _ _ _ _ Setting locale==== | |||
<br> | |||
::<pre style="background-color:#E6E6E6; border-color:blue; color:red; width:90%">sudo -i</pre> | |||
::<pre style="background-color:#E6E6E6; border-color:blue; color:red; width:90%">echo "LC_ALL=en_US.UTF-8" >> /etc/environment</pre> | |||
::<pre style="background-color:#E6E6E6; border-color:blue; color:red; width:90%">echo "en_US.UTF-8 UTF-8" >> /etc/locale.gen</pre> | |||
::<pre style="background-color:#E6E6E6; border-color:blue; color:red; width:90%">echo "LANG=en_US.UTF-8" > /etc/locale.conf</pre> | |||
::<pre style="background-color:#E6E6E6; border-color:blue; color:red; width:90%">locale-gen en_US.UTF-8</pre> | |||
====_ _ _ _ _ public/private keys==== | |||
<br> | |||
::To generate a public/private key pair, on your machine [laptop] run | |||
::<pre style="background-color:#E6E6E6; border-color:blue; color:red; width:90%">ssh-keygen -t ed25519 -b 320</pre> | |||
::Both public [<code style="background-color:#DDE3DB; border-color:#DDE3DB; color:blue;">id_ed25519.pub</code>] and private [<code style="background-color:#DDE3DB; border-color:#DDE3DB; color:blue;">id_ed25519</code>] keys are stored in a hidden <code style="background-color:#DDE3DB; border-color:#DDE3DB; color:blue;">.ssh</code> folder in the <code style="background-color:#DDE3DB; border-color:#DDE3DB; color:blue;">Home</code> directory. | |||
::To securely copy the contents of the public key into an <code style="background-color:#DDE3DB; border-color:#DDE3DB; color:blue;">authorized_keys</code> file on your RPi [run this on your machine] | |||
::<pre style="background-color:#E6E6E6; border-color:blue; color:red; width:90%">cat ~/.ssh/id_ed25519.pub | ssh ezn@192.168.1.4 "mkdir -p ~/.ssh && chmod 700 ~/.ssh && cat >> ~/.ssh/authorized_keys"</pre> | |||
====_ _ _ _ _ Disable pwd and root login==== | |||
<br> | |||
::<pre style="background-color:#E6E6E6; border-color:blue; color:red; width:90%">sudo nano /etc/ssh/sshd_config</pre> | |||
::Uncomment | |||
::<pre style="background-color:#E6E6E6; border-color:blue; color:red; width:90%">PermitRootLogin prohibit-password</pre> | |||
::Uncomment | |||
::<pre style="background-color:#E6E6E6; border-color:blue; color:red; width:90%">PubkeyAuthentication yes</pre> | |||
::Uncomment and set it to <code style="background-color:#DDE3DB; border-color:#DDE3DB; color:blue;">no</code> | |||
::<pre style="background-color:#E6E6E6; border-color:blue; color:red; width:90%">PasswordAuthentication no</pre> | |||
::Save changes | |||
::<pre style="background-color:#E6E6E6; border-color:blue; color:red; width:90%">Ctrl + s</pre> | |||
::<pre style="background-color:#E6E6E6; border-color:blue; color:red; width:90%">Ctrl + x</pre> | |||
====_ _ _ _ _ Reload SSH==== | |||
<br> | |||
::<pre style="background-color:#E6E6E6; border-color:blue; color:red; width:90%">sudo /etc/init.d/ssh restart</pre> | |||
====_ _ _ _ _ Reboot==== | |||
<br> | |||
::<pre style="background-color:#E6E6E6; border-color:blue; color:red; width:90%">sudo reboot</pre> | |||
====_ _ _ _ _ Login with a Host name==== | |||
<br> | |||
::To ssh w/a Host name [<code style="background-color:#DDE3DB; border-color:#DDE3DB; color:blue;">watermelon</code>, for example] as opposed to <code style="background-color:#DDE3DB; border-color:#DDE3DB; color:blue;">ssh ezn@192.168.1.4</code> or <code style="background-color:#DDE3DB; border-color:#DDE3DB; color:blue;">ssh ezn@kibkadar</code>, you'll need to modify the <code style="background-color:#DDE3DB; border-color:#DDE3DB; color:blue;">config</code> file in <code style="background-color:#DDE3DB; border-color:#DDE3DB; color:blue;">.ssh</code> directory. Open it: | |||
::<pre style="background-color:#E6E6E6; border-color:blue; color:red; width:90%">sudo nano ~/.ssh/config</pre> | |||
::and add the following: | |||
<div style="color:blue;"> | |||
::Host watermelon | |||
::User ezn | |||
::Hostname 192.168.1.4 | |||
::Port 22 | |||
::Identityfile /home/ezn/.ssh/id_ed25519 | |||
::Serveraliveinterval 30 | |||
</div> | |||
::<pre style="background-color:#E6E6E6; border-color:blue; color:red; width:90%">Ctrl + s</pre> | |||
::<pre style="background-color:#E6E6E6; border-color:blue; color:red; width:90%">Ctrl + x</pre> | |||
::Now you can ssh as Host | |||
::<pre style="background-color:#E6E6E6; border-color:blue; color:red; width:90%">ssh watermelon</pre> | |||
</div> | |||
<p>-----------------------------------------------------------------------------</p> | |||
::For Nginx and Tor setup >> [https://things.bleu255.com/runyourown/Static_Website_as_Tor_Hidden_Service_on_Raspberry_Pi instructions by Aymeric] | |||
</div> | |||
[[Category:RPi setup]] | |||
[[Category:Tools]] | |||
Latest revision as of 23:16, 1 June 2021
- Raspberry Pi is a single-board computer
___________________________________SD card
_ _ _ _ _ Download .img
- Download RPi image from raspberrypi.org either manually or using
wget. For instance, the latest release of Raspberry Pi OS Lite at the time of writing this is2021-01-11-raspios-buster-armhf-lite.zip
- Download RPi image from raspberrypi.org either manually or using
wget https://downloads.raspberrypi.org/raspios_lite_armhf/images/raspios_lite_armhf-2021-01-12/2021-01-11-raspios-buster-armhf-lite.zip
_ _ _ _ _ Verify Hash Key
- Hash key [ sha256 ] is provided on the website, next to the RPi image info. For
2021-01-11-raspios-buster-armhf-lite.zip, it'sd49d6fab1b8e533f7efc40416e98ec16019b9c034bc89c59b83d0921c2aefeef.
- Hash key [ sha256 ] is provided on the website, next to the RPi image info. For
sha256sum ~/Downloads/2021-01-11-raspios-buster-armhf-lite.zip
_ _ _ _ _ Unzip
unzip 2021-01-11-raspios-buster-armhf-lite.zip
_ _ _ _ _ Check mounted devices
- When you have an SD card inserted in your laptop, it will show up as a partition[s] on the list of mounted devices :
/dev/mmcblk0<#>[in my case:/dev/mmcblk0] df -h
- When you have an SD card inserted in your laptop, it will show up as a partition[s] on the list of mounted devices :
_ _ _ _ _ Unmount
- Unmount the SD card partition[s] [in this case it's only
/dev/mmcblk0]
- Unmount the SD card partition[s] [in this case it's only
umount /dev/mmcblk0
_ _ _ _ _ .img-to-SD
- To write the image to the SD card, run the following command, but make sure
of=argument output is a correct device name, meaning the whole SD card and not one of its partitions!
- To write the image to the SD card, run the following command, but make sure
sudo dd bs=4M status=progress if=2021-01-11-raspios-buster-armhf-lite.img of=/dev/mmcblk0
sudo sync
_ _ _ _ _ ssh file
- Create a file named
sshin a boot partition
- Create a file named
cd /media/ezn/boot
touch ssh
- SD card is good to go. Insert the card in RPi before powering it on, and shutdown the Raspberry Pi before unplugging the card.
___________________________________RPi
- Default user:
pi - Default pwd:
raspberry - Default hostname:
raspberrypi
- Default user:
_ _ _ _ _ ssh
- Connect your RPi to a router with an ethernet cable. To try to ssh into it using the default credentials
ssh pi@raspberrypi
- If it didn't work, find the RPi IP address first. For this reason, scan your local network
nmap -sn 192.168.1.1-255
- I'm gonna use my RPi IP address [
192.168.1.4], and default username [pi] and password [raspberry] to ssh into it
- I'm gonna use my RPi IP address [
ssh pi@192.168.1.4
- In case you get the following message:
Wi-Fi is currently blocked by rfkill
- In case you get the following message:
sudo rfkill unblock 0
_ _ _ _ _ Hostname
- To change the hostname from the default
raspberrypito your desired one
- To change the hostname from the default
sudo raspi-config
- Go to
System Options, selectHostnameand rename it. Then<Ok>and<Finish>. You'll be asked to reboot the RPi.
- Go to
_ _ _ _ _ Add a user
- Switch to
root
- Switch to
sudo -i
- To add a user [
ezn, for instance]
- To add a user [
adduser ezn
- You'll be prompted to set a password for this user
- To add
eznto a sudo group
- To add
adduser ezn sudo
- To check if
eznis indeed sudo
- To check if
id ezn
- If
eznis a sudo user, the command should output27(sudo)at the end of the line, afteruid,gidandgroups.
- If
- To switch to a specific user
sudo su - ezn
_ _ _ _ _ Remove default pi user
- Since during the configuration, we initially logged in as
pi, we need to log out from it first and then delete it. So, runlogoutorexituntil you're completely out and then ssh back into RPi asezn
- Since during the configuration, we initially logged in as
ssh ezn@192.168.1.4
sudo -i
deluser pi
- To check a list of users
cut -d: -f1 /etc/passwd
_ _ _ _ _ Setting locale
sudo -i
echo "LC_ALL=en_US.UTF-8" >> /etc/environment
echo "en_US.UTF-8 UTF-8" >> /etc/locale.gen
echo "LANG=en_US.UTF-8" > /etc/locale.conf
locale-gen en_US.UTF-8
_ _ _ _ _ public/private keys
- To generate a public/private key pair, on your machine [laptop] run
ssh-keygen -t ed25519 -b 320
- Both public [
id_ed25519.pub] and private [id_ed25519] keys are stored in a hidden.sshfolder in theHomedirectory.
- Both public [
- To securely copy the contents of the public key into an
authorized_keysfile on your RPi [run this on your machine]
- To securely copy the contents of the public key into an
cat ~/.ssh/id_ed25519.pub | ssh ezn@192.168.1.4 "mkdir -p ~/.ssh && chmod 700 ~/.ssh && cat >> ~/.ssh/authorized_keys"
_ _ _ _ _ Disable pwd and root login
sudo nano /etc/ssh/sshd_config
- Uncomment
PermitRootLogin prohibit-password
- Uncomment
PubkeyAuthentication yes
- Uncomment and set it to
no
- Uncomment and set it to
PasswordAuthentication no
- Save changes
Ctrl + s
Ctrl + x
_ _ _ _ _ Reload SSH
sudo /etc/init.d/ssh restart
_ _ _ _ _ Reboot
sudo reboot
_ _ _ _ _ Login with a Host name
- To ssh w/a Host name [
watermelon, for example] as opposed tossh ezn@192.168.1.4orssh ezn@kibkadar, you'll need to modify theconfigfile in.sshdirectory. Open it:
- To ssh w/a Host name [
sudo nano ~/.ssh/config
- and add the following:
- Host watermelon
- User ezn
- Hostname 192.168.1.4
- Port 22
- Identityfile /home/ezn/.ssh/id_ed25519
- Serveraliveinterval 30
Ctrl + s
Ctrl + x
- Now you can ssh as Host
ssh watermelon
-----------------------------------------------------------------------------
- For Nginx and Tor setup >> instructions by Aymeric

