EtherPatches: Difference between revisions
(Update Usage section) |
m (Fix typo) |
||
| (9 intermediate revisions by the same user not shown) | |||
| Line 1: | Line 1: | ||
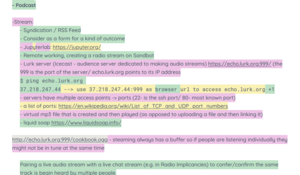
[[File:EtherPatch-example-1.png|thumb|right|Original screenshot]] | [[File:EtherPatch-example-1.png|thumb|right|Original screenshot]] | ||
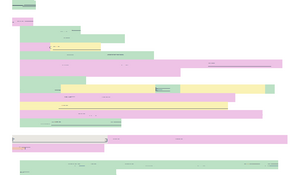
[[File:EtherPath-example-3.png|thumb|right|End Result]] | |||
[[File:EtherPath-example-3.png|thumb|right|End Result | |||
EtherPatches is a program to convert [[Etherpad]] screenshots to | EtherPatches is a program to convert [[Etherpad]] screenshots to 'patched' ones in which the text has been removed. | ||
Find the code on [https://github.com/Nyxaeroz/EtherPatches GitHub]. | Find the code on [https://github.com/Nyxaeroz/EtherPatches GitHub]. | ||
| Line 19: | Line 17: | ||
* The easiest is downloading the [https://processing.org/ Processing IDE] | * The easiest is downloading the [https://processing.org/ Processing IDE] | ||
* You can also compile [https://github.com/processing/processing/wiki/Command-Line from the command line] | * You can also compile [https://github.com/processing/processing/wiki/Command-Line from the command line] | ||
* Your favorite IDE might offer plugins for Processing language and compilation support, like [https://marketplace.visualstudio.com/items?itemName=Luke-zhang-04.processing-vscode this one for vscode] < | * Your favorite IDE might offer plugins for Processing language and compilation support, like [https://marketplace.visualstudio.com/items?itemName=Luke-zhang-04.processing-vscode this one for vscode] </li> | ||
<li>Next, you need to obtain the code. Again, there are several options: | <li>Next, you need to obtain the code. Again, there are several options: | ||
* Go to https://github.com/Nyxaeroz/EtherPatches, press the button that says <tt style="color:green;">code</tt>, download the zip and unzip it wherever you want this project to reside on your machine. | * Go to https://github.com/Nyxaeroz/EtherPatches, press the button that says <tt style="color:green;">code</tt>, download the zip and unzip it wherever you want this project to reside on your machine. | ||
| Line 25: | Line 23: | ||
<li>Select the Etherpad you want to patch.</li> | <li>Select the Etherpad you want to patch.</li> | ||
<li>Make sceenshots of the pad and save them to the directory called <tt>input</tt>.</li> | <li>Make sceenshots of the pad and save them to the directory called <tt>input</tt>.</li> | ||
<li>Run the program. A window will appear with the before-and-after. You can close it. (If he screenshots don't fully fit, that's okay, the display is unrelated to the conversion)</li> | <li>Run the program. A window will appear with the before-and-after. You can close it. (If he screenshots don't fully fit, that's okay, the display is unrelated to the conversion.)</li> | ||
<li>View your patched screenshots in the directory called <tt>output</tt>. | <li>View your patched screenshots in the directory called <tt>output</tt>. | ||
</ol> | </ol> | ||
==Notes== | ==Notes== | ||
When cloning / downloading the repository, example files are included | When cloning / downloading the repository, example files are included in the <tt>example</tt> directory, they are used in the <tt>README.md</tt> file. The <tt>input</tt> directory contains sample screenshots, and the <tt>output</tt> directory contains the patched versions of these samples. You could delete everything in the <tt>output</tt> directory and run the program to verify everything has been setup correctly: the same patched files should appear. | ||
Note that any file with name <tt>FILENAME.png</tt> in the <tt>input</tt> directory will be converted to a file with name <tt>PATCHED-FILENAME.png</tt> in the output directory. | Note that any file with name <tt>FILENAME.png</tt> in the <tt>input</tt> directory will be converted to a file with name <tt>PATCHED-FILENAME.png</tt> in the output directory. | ||
| Line 37: | Line 35: | ||
You could play around with some parameters. In particular: | You could play around with some parameters. In particular: | ||
* <code>hpass_window</code> and <code>vpass_window</code> set the window sizes for the horizontal and vertical passes over the pixels respectively. 5 resp. 20 seem to work well, but other configurations might be better, depending e.g. on your screen's resolution. | * <code>hpass_window</code> and <code>vpass_window</code> set the window sizes for the horizontal and vertical passes over the pixels respectively. 5 resp. 20 seem to work well, but other configurations might be better, depending e.g. on your screen's resolution. | ||
* <code>input_dir</code> and <code>output_dir</code> may be altered to use | * <code>input_dir</code> and <code>output_dir</code> may be altered to use different input resp. output directories. | ||
* <code>batch</code> may be set to false to not use batch conversion, but instead convert just one file. In this case <code>filename</code> will be converted. Note that single file conversion is possible through the batch conversion, too (just place 1 screenshot in the <tt>input</tt> directory) and this single file conversion option is present for debugging reasons. But you could use it, if you want. | * <code>batch</code> may be set to false to not use batch conversion, but instead convert just one file. In this case <code>filename</code> will be converted. Note that single file conversion is possible through the batch conversion, too (just place 1 screenshot in the <tt>input</tt> directory) and this single file conversion option is present for debugging reasons. But you could use it, if you want. | ||
* <code>display</code> may be set to false to not display anything. | * <code>display</code> may be set to false to not display anything. | ||
| Line 43: | Line 41: | ||
=Method= | =Method= | ||
This section discusses how one file is converted. For batch conversion, this process is then applied to multiple elements. | |||
First, an image is loaded into a <code>PImage</code>, which allows for pixel level retrieval and manipulation. This is exactly what we'll be doing: retrieving pixels from the input image and writing pixels to another <code>PImage</code>. Our task is to find 'bad' pixels (those's belonging to text) and replacing them with 'good' ones (the corresponding marker color). | |||
We make two passes over the pixels. First, a ''horizontal pass'' and then a ''vertical pass''. Each pass can be thought of as a window (of size 1x<code>hpass_winow</code> resp. <code>vpass_window</code>x1) moving over the pixels. The window keeps track of the current marker, and if the marker color is present elsewhere in the window, it is assumed we're still in the same line of text. N.B. increasing the window size will therefore result in an overadjustment: a <code>hpass_window</code> size of 20 will often remove single character adjustments. | |||
The horizontal pass looks like this: | |||
<syntaxhighlight lang="java"> | |||
for ( int y = 0; y < h; y++ ) { | |||
color cur_marker = #FFFFFF; | |||
for ( int x = 0; x < w; x++ ) { | |||
color cur = input.get( x, y ); | |||
if ( cc( cur, #FFFFFF ) ) { cur_marker = #FFFFFF; } | |||
else if ( !cc( cur, cur_marker ) && !is_marker_present( cur_marker, x, y, hpass_window ) ) { cur_marker = cur; } | |||
output.set( x ,y , cur_marker ); | |||
} | |||
} | |||
</syntaxhighlight> | |||
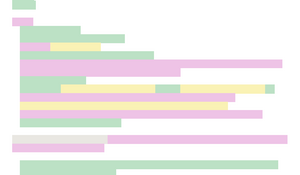
[[File:EtherPatch-example-2.png|thumb|right|Intermediate result: after horizontal pass]] | |||
Here, two helper functions are used: <code>cc(color, color)</code> for comparing two colors and <code>is_marker_present(color,int,int,int)</code> to check if the marker color is present. | |||
If a line of pixels starts with a 'bad' pixel, this will be assumed as the marker color, and hence will often produce a line of 'bad' pixels (see image of intermediate result). Hence, we need a vertical pass after the horizontal pass. The vertical pass is almost identical to the horizontal pass, with 3 notable exeptions: | |||
* Not the input image, but the result of the horizontal pass is used (which is at that time stored in <code>output</code> -- we will override this <code>PImage</code>). | |||
* Instead of looking at the pixels to the right of any pixel we're examining, we're looking at the pixels down. This allows us to 'jump' over these thin lines that are left as artefacts of the horizontal pass. | |||
* We use the variable <code>vpass_window</code> instead of <code>hpass_window</code>. As the lineheight in Etherpads is greater than the character width, we can allow for the vertical window to be of a greater size than the horizontal window. | |||
<syntaxhighlight lang="java"> | |||
for ( int x = 0; x < w; x++ ) { | |||
color cur_marker = #FFFFFF; | |||
for ( int y = 0; y < h; y++ ) { | |||
color cur = output.get( x, y ); | |||
if ( cc( cur, #FFFFFF ) ) { cur_marker = #FFFFFF; } | |||
else if ( !cc( cur, cur_marker ) && !is_marker_present_down( cur_marker, x, y, vpass_window ) ) { cur_marker = cur; } | |||
output.set( x, y, cur_marker ); | |||
} | |||
} | |||
</syntaxhighlight> | |||
It might be interesting to note the three conditions there are for a window to continue with the current marker color: | |||
* The color white is found (indicating the end of a marked segment -- we are thus fine continuing it for now). | |||
* We find another color, but our marker color appears within the window once more. This suggests we are not yet in a new marked segment, but rather have encountered part of a character of text. | |||
* The window reaches out of bounds of the image without having passed either of the previous two checks*. This is implied in the above code -- the marked segment will continue untill the edge of the screen, so we can continue it. | |||
(*At least, I think Java (and therefore Processing) implements lazy evaluation.. Either way, it doesn't really matter for our purposes, Processing allows for out of bounds retrieval calls in images.) | |||
<syntaxhighlight lang="java"> | |||
boolean is_marker_present( color m, int x, int y, int n ) { | |||
for ( int i = 1; i < n + 1; i++ ) { | |||
color c = input.get( x+i, y ); | |||
if ( cc( c, m ) || cc( c, #FFFFFF ) || x+i >= w ) { return true; } | |||
} | |||
return false; | |||
} | |||
</syntaxhighlight> | |||
The funtion <code>is_marker_present_down(color, int, int, int)</code> is identical, except for adding <code>i</code> to <code>y</code> instead of <code>x</code>. | |||
==Limitations== | |||
At the moment, the program will not be able to handle any lines that use white characters (in particular, a completely black marker color). | |||
Latest revision as of 16:29, 14 January 2024
EtherPatches is a program to convert Etherpad screenshots to 'patched' ones in which the text has been removed.
Find the code on GitHub.
Usage
EtherPatches is easy to use. It supports batch conversion: the program automatically converts everything in the input directory and saves the patched works to the output directory.
A step by step guide to EtherPatch your own pads is presented below. Setting up processing on your machine and obtaining the files (steps 1 and 2) need to be done only once.
- To patch your own etherpads, you'll need to be able to compile a Processing file. For this, there are several options:
- The easiest is downloading the Processing IDE
- You can also compile from the command line
- Your favorite IDE might offer plugins for Processing language and compilation support, like this one for vscode
- Next, you need to obtain the code. Again, there are several options:
- Go to https://github.com/Nyxaeroz/EtherPatches, press the button that says code, download the zip and unzip it wherever you want this project to reside on your machine.
- Moving to your desired location and use the following command in a terminal to clone the repository:
git clone https://github.com/Nyxaeroz/EtherPatches.git
- Select the Etherpad you want to patch.
- Make sceenshots of the pad and save them to the directory called input.
- Run the program. A window will appear with the before-and-after. You can close it. (If he screenshots don't fully fit, that's okay, the display is unrelated to the conversion.)
- View your patched screenshots in the directory called output.
Notes
When cloning / downloading the repository, example files are included in the example directory, they are used in the README.md file. The input directory contains sample screenshots, and the output directory contains the patched versions of these samples. You could delete everything in the output directory and run the program to verify everything has been setup correctly: the same patched files should appear.
Note that any file with name FILENAME.png in the input directory will be converted to a file with name PATCHED-FILENAME.png in the output directory.
Parameters
You could play around with some parameters. In particular:
hpass_windowandvpass_windowset the window sizes for the horizontal and vertical passes over the pixels respectively. 5 resp. 20 seem to work well, but other configurations might be better, depending e.g. on your screen's resolution.input_dirandoutput_dirmay be altered to use different input resp. output directories.batchmay be set to false to not use batch conversion, but instead convert just one file. In this casefilenamewill be converted. Note that single file conversion is possible through the batch conversion, too (just place 1 screenshot in the input directory) and this single file conversion option is present for debugging reasons. But you could use it, if you want.displaymay be set to false to not display anything.size(2000,600)may be altered for a different canvas size. This will not affect the conversion of screenshots.
Method
This section discusses how one file is converted. For batch conversion, this process is then applied to multiple elements.
First, an image is loaded into a PImage, which allows for pixel level retrieval and manipulation. This is exactly what we'll be doing: retrieving pixels from the input image and writing pixels to another PImage. Our task is to find 'bad' pixels (those's belonging to text) and replacing them with 'good' ones (the corresponding marker color).
We make two passes over the pixels. First, a horizontal pass and then a vertical pass. Each pass can be thought of as a window (of size 1xhpass_winow resp. vpass_windowx1) moving over the pixels. The window keeps track of the current marker, and if the marker color is present elsewhere in the window, it is assumed we're still in the same line of text. N.B. increasing the window size will therefore result in an overadjustment: a hpass_window size of 20 will often remove single character adjustments.
The horizontal pass looks like this:
  for ( int y = 0; y < h; y++ ) {
    color cur_marker = #FFFFFF;
    for ( int x = 0; x < w; x++ ) {
      color cur = input.get( x, y );
      if ( cc( cur, #FFFFFF ) ) { cur_marker = #FFFFFF; }
      else if ( !cc( cur, cur_marker ) && !is_marker_present( cur_marker, x, y, hpass_window ) ) { cur_marker = cur; }
      output.set( x ,y , cur_marker );
    }
  }
Here, two helper functions are used: cc(color, color) for comparing two colors and is_marker_present(color,int,int,int) to check if the marker color is present.
If a line of pixels starts with a 'bad' pixel, this will be assumed as the marker color, and hence will often produce a line of 'bad' pixels (see image of intermediate result). Hence, we need a vertical pass after the horizontal pass. The vertical pass is almost identical to the horizontal pass, with 3 notable exeptions:
- Not the input image, but the result of the horizontal pass is used (which is at that time stored in
output-- we will override thisPImage). - Instead of looking at the pixels to the right of any pixel we're examining, we're looking at the pixels down. This allows us to 'jump' over these thin lines that are left as artefacts of the horizontal pass.
- We use the variable
vpass_windowinstead ofhpass_window. As the lineheight in Etherpads is greater than the character width, we can allow for the vertical window to be of a greater size than the horizontal window.
  for ( int x = 0; x < w; x++ ) {
    color cur_marker = #FFFFFF;
    for ( int y = 0; y < h; y++ ) {
      color cur = output.get( x, y );
      if ( cc( cur, #FFFFFF ) ) { cur_marker = #FFFFFF; }
      else if ( !cc( cur, cur_marker ) && !is_marker_present_down( cur_marker, x, y, vpass_window ) ) { cur_marker = cur; }
      output.set( x, y, cur_marker );
    }
  }
It might be interesting to note the three conditions there are for a window to continue with the current marker color:
- The color white is found (indicating the end of a marked segment -- we are thus fine continuing it for now).
- We find another color, but our marker color appears within the window once more. This suggests we are not yet in a new marked segment, but rather have encountered part of a character of text.
- The window reaches out of bounds of the image without having passed either of the previous two checks*. This is implied in the above code -- the marked segment will continue untill the edge of the screen, so we can continue it.
(*At least, I think Java (and therefore Processing) implements lazy evaluation.. Either way, it doesn't really matter for our purposes, Processing allows for out of bounds retrieval calls in images.)
  boolean is_marker_present( color m, int x, int y, int n ) {
    for ( int i = 1; i < n + 1; i++ ) {
      color c = input.get( x+i, y );
      if ( cc( c, m ) || cc( c, #FFFFFF ) || x+i >= w ) { return true; }
    }
    return false;
  }
The funtion is_marker_present_down(color, int, int, int) is identical, except for adding i to y instead of x.
Limitations
At the moment, the program will not be able to handle any lines that use white characters (in particular, a completely black marker color).


