Arduino101-LFP: Difference between revisions
| Line 44: | Line 44: | ||
---- | ---- | ||
Exercise 3: Crude LFO (Low Frequency Oscillator) | '''Exercise 3''': Crude LFO (Low Frequency Oscillator) | ||
<pre> | <pre> | ||
| Line 72: | Line 72: | ||
</pre> | </pre> | ||
''' | ''Credits: https://github.com/binaryupdates/PWM-With-Arduino'' | ||
While this example can be written in one line, this is intentionally explicit, for readability and since it introduces a new functions (analogWrite). Upload it to Meergranen (2) and connect its output port to one of the inputs of Meergranen (1). | |||
'''Questions:''' | |||
* How to make it sound more smooth? | |||
* How to make it faster? | |||
* Does this work with the 'Framen' and Drums v2 firmwares found in the [http://dennisdebel.nl/downloads/xpub/example-firmware/ ZIP v2 Codes]? | |||
---- | ---- | ||
Latest revision as of 23:18, 30 September 2019
Specific Arduino Primer for Meergranen
Interfacing
Basics
Exercise 1: in groups of two, needed:
- Two Meergranen playing a sample.
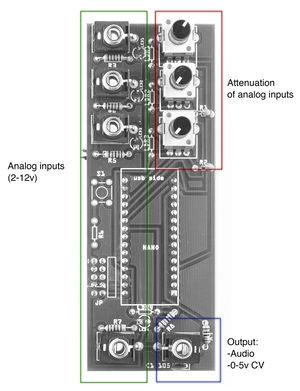
Hook up the Output of one Meergranen to any of the Analog Inputs jacks (see below) on the other Meergranen. Tweak the Potentiometers, What happens?
 In and outputs of the Meergranen module. Use the output ONLY as output!
Exercise 2: in groups of two, needed:
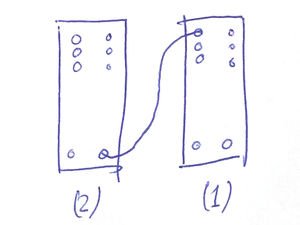
- One Meergranen playing a sample, below referred to as Meergranen (1)
- One Meergranen hooked up to a computer with Arduino IDE open. Below referred to as Meergranen (2)
Instead of sound output you can also send control voltage (approximately) from meergranen. Lets see how we can control Meergranen (1) by sending control voltage from Meergranen (2). On Meergranen (2) load the following code:
void setup() {
  pinMode(11, OUTPUT); //set pin 11 in output mode
}

// the loop function runs over and over again forever
void loop() {
  digitalWrite(11, HIGH);   // turn the PIN on (HIGH is the highest voltage level, 5v)
  delay(1000);                       // wait for a second
  digitalWrite(11, LOW);    // turn the PIN off by making the voltage LOW (0v)
  delay(1000);                       // wait for a second
}
This is the default LED Blink example, but instead of blinking the standard built-in LED, we send the voltage to the OUTPUT jack of Meergranen. Hook up the output (lower right jack) of Meergranen (2) any of the inputs of Meergranen (1) (NOT THE OUTPUT, this one is not protected against any incoming currents at all). Listen to the output of Meergranen (1) using headphones. What do you hear? What happens when you try other inputs (left side jacks) on Meergranen (1)?
Exercise 3: Crude LFO (Low Frequency Oscillator)
int pwmPin = 11; //define output pin, Meergranen output pin is 11

void setup() {
 pinMode(pwmPin, OUTPUT);
}

void loop() {

  for(int value = 0; value<=255; value++){
    analogWrite(pwmPin, value);
    delay(30);
    }

  delay(30);

  for(int value = 255; value>=0; value--){
     analogWrite(pwmPin, value);
    delay(30);
    }

  delay(10);

}
Credits: https://github.com/binaryupdates/PWM-With-Arduino
While this example can be written in one line, this is intentionally explicit, for readability and since it introduces a new functions (analogWrite). Upload it to Meergranen (2) and connect its output port to one of the inputs of Meergranen (1).
Questions:
- How to make it sound more smooth?
- How to make it faster?
- Does this work with the 'Framen' and Drums v2 firmwares found in the ZIP v2 Codes?
Assignment (in groups of two)
- Create a sample containing various sounds (within 3sec, 8000Hz) or use one that already has these characteristics, upload to one of your modules.
- On a second module, write a code that can sequence / play the different parts of this sample individually, using analogWrite. Hints 1, 2
- Upload to GIT (exercises/trigger/yourgroupname )
Extendend
- Use built in potentiometers to control control voltage: https://git.xpub.nl/XPUB/special-issue-x/src/branch/master/basics/simple-pwm-led-audio/

