PI LED strips: Difference between revisions
Andre Castro (talk | contribs) No edit summary |
Andre Castro (talk | contribs) |
||
| (7 intermediate revisions by 2 users not shown) | |||
| Line 22: | Line 22: | ||
For the this recipe we will use: | For the this recipe we will use: | ||
* SPI0_MOSI: PIN 19 - Connected to LED's SI (data) | * SPI0_MOSI: '''Pi PIN 19''' (10th pin down left side) - Connected to LED's '''SI (data)''' | ||
* SPI0_CLK: PIN 23 - Connected to LED's CK (clock) | * SPI0_CLK: '''Pi PIN 23''' (12th pin down left side) - Connected to LED's '''CK (clock)''' | ||
* Ground: '''Pi Ground Pin''' - Connected to LED's '''GND''' - Connected to Power supply '''-''' | |||
* 5V: LED's '''5V''' - Connected to Power supply '''+''' | |||
[[File:PI-GPIO40.png|400px]] | [[File:PI-GPIO40.png|400px]] | ||
| Line 42: | Line 44: | ||
https://github.com/adafruit/Adafruit_Python_WS2801/ python library], design to control the WS2801 LED strips from Python on Pi, which takes care of a lot of the boring work, and let's get right onto controlling the LEDs. | https://github.com/adafruit/Adafruit_Python_WS2801/ python library], design to control the WS2801 LED strips from Python on Pi, which takes care of a lot of the boring work, and let's get right onto controlling the LEDs. | ||
using python 3 ( | using python 3 (it works): | ||
sudo pip3 install adafruit-ws2801 | sudo pip3 install adafruit-ws2801 | ||
| Line 57: | Line 59: | ||
Simple examples can be found in https://github.com/adafruit/Adafruit_Python_WS2801/tree/master/examples | Simple examples can be found in https://github.com/adafruit/Adafruit_Python_WS2801/tree/master/examples | ||
---- | |||
=Lifehack agent= | |||
* MOSI: pin (10)19 | |||
* CLK: pin (12) 23 | |||
* Ground | |||
=debug = | |||
To see if the connections are right, I used the python spidev lib to test the 1st LED | |||
<source lang="python"> | |||
import spidev | |||
spi = spidev.SpiDev() | |||
spi.open(0,0) # open the device | |||
spi.max_speed_hz = 1000000 | |||
spi.xfer([0b1010100]) # controls the color of first LED | |||
sleep(5) | |||
spi.xfer([0b1010111]) # different color | |||
</source> | |||
= Other Python libraries for controlling WS2801= | |||
https://pypi.org/project/WS2801-RPI/ | |||
[[Category:Cookbook]] [[Category:RaspberryPi]] | [[Category:Cookbook]] [[Category:RaspberryPi]] | ||
Latest revision as of 19:01, 20 January 2019
How to control WS2801 RGB Ledstrip with a Raspberry Pi (model 3)
Following: https://tutorials-raspberrypi.com/how-to-control-a-raspberry-pi-ws2801-rgb-led-strip/
LED strips:WS2801
WS2801B strips have two data lines (data and clock), whereby individual LEDs can be addressed via the integrated SPI bus of the Raspberry Pi.
Connections
Pi GPIOs: SPI
https://www.raspberrypi.org/documentation/hardware/raspberrypi/spi/README.md
The Raspberry Pi is equipped with one Serial Peripheral Interface (SPI) bus that has 2 chip selects.
The SPI master driver is disabled by default on Raspbian.
To enable it, use raspi-config, or ensure the line dtparam=spi=on isn't commented out in /boot/config.txt, and reboot. If the SPI driver was loaded, you should see the device /dev/spidev0.0.
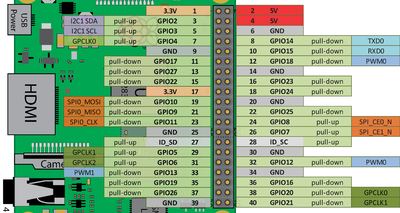
For the this recipe we will use:
- SPI0_MOSI: Pi PIN 19 (10th pin down left side) - Connected to LED's SI (data)
- SPI0_CLK: Pi PIN 23 (12th pin down left side) - Connected to LED's CK (clock)
- Ground: Pi Ground Pin - Connected to LED's GND - Connected to Power supply -
- 5V: LED's 5V - Connected to Power supply +
Power
The LED strip requires 5V and for each around 2A, which is more than the GPIOs of Raspberry Pi can deliver.
Therefore an external current source for the RGB stripe is need.
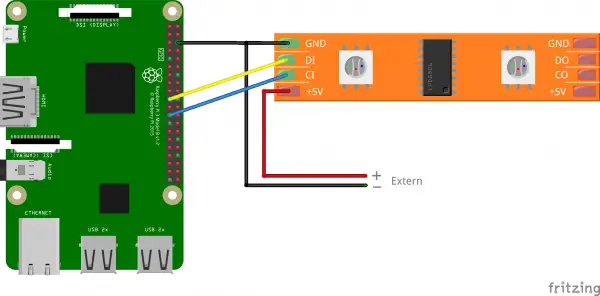
Wiring of PI + Power to LED should follow the following scheme (Note that Pi's ground is also connected to the LEDs ground pin)

Controlling LEDs
Adafruit created a [ https://github.com/adafruit/Adafruit_Python_WS2801/ python library], design to control the WS2801 LED strips from Python on Pi, which takes care of a lot of the boring work, and let's get right onto controlling the LEDs.
using python 3 (it works):
sudo pip3 install adafruit-ws2801
using python 2:
sudo pip install adafruit-ws2801
installing from source:
git clone https://github.com/adafruit/Adafruit_Python_WS2801.git
cd Adafruit_Python_WS2801
sudo python setup.py install
Examples:
Simple examples can be found in https://github.com/adafruit/Adafruit_Python_WS2801/tree/master/examples
Lifehack agent
- MOSI: pin (10)19
- CLK: pin (12) 23
- Ground
debug
To see if the connections are right, I used the python spidev lib to test the 1st LED
import spidev
spi = spidev.SpiDev()
spi.open(0,0) # open the device
spi.max_speed_hz = 1000000

spi.xfer([0b1010100]) # controls the color of first LED
sleep(5)
spi.xfer([0b1010111]) # different color

