Interfacing the law javascript Zalan Szakacs: Difference between revisions
No edit summary |
No edit summary |
||
| Line 295: | Line 295: | ||
[https://medium.com/@necsoft/three-js-101-hello-world-part-1-443207b1ebe1 theory] + | [https://medium.com/@necsoft/three-js-101-hello-world-part-1-443207b1ebe1 theory] + | ||
[https://www.youtube.com/playlist?list=PLcUid3OP_4OVX8zp-ZTcyOsp6C9CJCqd0 tutorial] | [https://www.youtube.com/playlist?list=PLcUid3OP_4OVX8zp-ZTcyOsp6C9CJCqd0 tutorial] | ||
Three.js is a Javascript library developed by Ricardo Cabello (@mrdoob) in 2010 (today it has many contributors on Github). This incredible tool let us work with 3D graphics on the browser, using WebGL in a very simple and intuitive way. | |||
<gallery class="center" widths=692px heights=405px> | <gallery class="center" widths=692px heights=405px> | ||
| Line 300: | Line 302: | ||
</gallery> | </gallery> | ||
<br> | <br> | ||
The renderer is the place where the result of the scene will be visible. In Three.js we can have multiple scenes and each one can have different objects. | |||
<gallery class="center" widths=692px heights=405px> | <gallery class="center" widths=692px heights=405px> | ||
| Line 305: | Line 309: | ||
</gallery> | </gallery> | ||
<br> | <br> | ||
In Three.js a Mesh is the composition of a Geometry with a Material. | |||
<gallery class="center" widths=692px heights=405px> | <gallery class="center" widths=692px heights=405px> | ||
| Line 310: | Line 316: | ||
</gallery> | </gallery> | ||
<br> | <br> | ||
A Geometry is the mathematical formula of an object, in Three.js we have many geometries, we’ll explore it in future chapters. A Geometry give us the vertices of the object we want to add to the scene. | |||
<gallery class="center" widths=692px heights=405px> | <gallery class="center" widths=692px heights=405px> | ||
| Line 315: | Line 323: | ||
</gallery> | </gallery> | ||
<br> | <br> | ||
A Material can be defined as the properties of an object and its behavior with the light sources of the scene. As you can see in the following image there are different types of materials. | |||
Console became my friend after time...Debugging, debugging, debugging... | |||
<gallery class="center" widths=692px heights=405px> | <gallery class="center" widths=692px heights=405px> | ||
Revision as of 10:43, 6 June 2018
JavaScript
Canvas
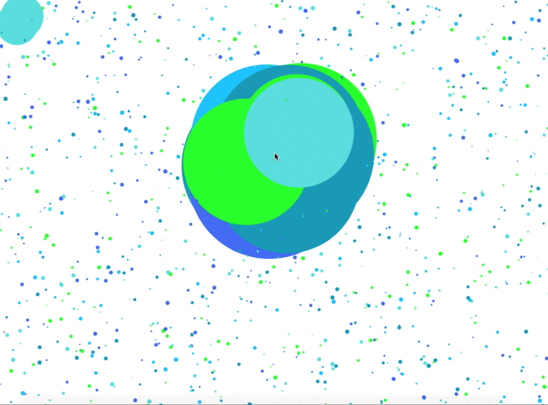
First I started with basic beginners JavaScript tutorials and tried to explore the canvas library.
var canvas = document.querySelector('canvas')
	;

canvas.width = window.innerWidth;
canvas.height = window.innerHeight;


var c  = canvas.getContext('2d');

// c.fillStyle = 'rgba(255, 0, 0, 1)';
// c.fillRect(100, 100, 100, 100);
// c.fillStyle = 'rgba(0, 0, 255, 1)';
// c.fillRect(400, 100, 100, 100);
// c.fillStyle = 'rgba(0, 255, 0, 1)';
// c.fillRect(300, 300, 100, 100);
// console.log(canvas);

//Line

// c.beginPath();
// c.moveTo(50,300);
// c.lineTo(300,100);
// c.strokeStyle = 'rgba(0, 0, 255, 1)';
// c.stroke();

//Arc

//c.beginPath();
//c.arc(300, 300, 30, 0, Math.PI * 2, false);
//c.strokeStyle = 'red';
//c.stroke();

// for (var i = 0; i < 10; i++) {
// 	var x = Math.random() * window.innerWidth;
// 	var y = Math.random() * window.innerHeight;
// 	c.beginPath();
// 	c.arc(x, y, 30, 0,  Math.PI * 2, false);

// 	//c.fillStyle = 'rgba(0, 255, 0, 0.5)';
// 	//c.fill();
// 	c.strokeStyle = 'red';
// 	c.stroke();
// }

var mouse = {

	x: undefined,
	y: undefined

}

var maxRadius = 40;
//var minRadius = 2;

var colorArray = [
	'#4166f5',
	'#00bfff',
	'#11ff00',
	'#55dddd',
	'#0d98ba',
];

console.log(colorArray.length);

window.addEventListener('mousemove', function(event) {
	mouse.x = event.x;
	mouse.y = event.y;


})

window.addEventListener('resize', function()
	{

	canvas.width = window.innerWidth;
	canvas.height = window.innerHeight;

	init();


});

function Circle(x, y, dx, dy, radius) {
	this.x = x;
	this.y = y;
	this.dx = dx;
	this.dy = dy;
	this.radius = radius;
	this.minRadius = radius;
	this.color = colorArray[Math.floor(Math.random() * colorArray.length)];

	this.draw = function() {
		c.beginPath();

		c.arc(this.x, this.y, this.radius, 30, 0, Math.PI * 2, false);
		c.fillStyle = this.color;
		c.fill();

	}

	this.update = function() {
		if (this.x  + this.radius > innerWidth || this.x - this.radius < 0) {
		this.dx = -this.dx;

	}

	if (this.y + this.radius > innerHeight || this.y - this.radius < 0) {
		this.dy = -this.dy;
	}

	this.x += this.dx;
	this.y += this.dy;

	//interactivity

	if (mouse.x - this.x < 50 && mouse.x - this.x > -50
		&& mouse.y - this.y < 50 && mouse.y - this.y > -50


		) {
		if (this.radius < maxRadius) {
			this.radius += 1;
		}
		this.radius += 1;
	} else if (this.radius > this.minRadius) {
		this.radius -= 1;
	}


	this.draw();


	}

}


var circleArray =[];


function init() {

	circleArray = [];

	for (var i = 0; i < 1000; i++) {
		var radius = Math.random() * 3 + 1;
		var x = Math.random() * (innerWidth - radius * 2) + radius;
		var y = Math.random() * (innerHeight - radius * 2) + radius;
		var dx = (Math.random() - 0.5);
		var dy = (Math.random() - 0.5);

		circleArray.push(new Circle(x, y, dx, dy, radius));


	}


}

function animate() {
	requestAnimationFrame(animate);
	c.clearRect(0,0, innerWidth, innerHeight);


	for (var i = 0; i < circleArray.length; i++) {
		circleArray[i].update();


	}


}

init();

animate();
Drawing script
var canvas = document.getElementById('canvas');
var context = canvas.getContext('2d');

canvas.width = window.innerWidth;
canvas.height = window.innerHeight;


window.addEventListener('resize', function()
	{


	init();


});
var radius = 5;
var dragging = false;

canvas.width = window.innerWidth;
canvas.height = window.innerHeight;

context.lineWidth = radius*2;

var putPoint = function(e) {
	if(dragging){
		context.lineTo(e.clientX, e.clientY);
		context.strokeStyle = '#55dddd';
		context.stroke();
		context.beginPath();
		context.arc(e.clientX, e.clientY, radius, 8, Math.PI*2);
		context.fillStyle = '#55dddd';
		context.fill();
		context.beginPath();
		context.moveTo(e.clientX, e.clientY);
	}
}

var engage = function(e){
	dragging = true;
	putPoint(e);
}

var disengage = function(){
	dragging = false;
	context.beginPath();

}


canvas.addEventListener('mousedown', engage);
canvas.addEventListener('mousemove', putPoint);
canvas.addEventListener('mouseup', disengage);
ThreeJs
To be understand the use of the 3D in JavaScript I had to dive in to some theory of the system how it is build up. Having 3D experience from Cinem4D it helped a bit to get familiar with ThreeJs. Very useful sites were the following ones:
theory +
tutorial
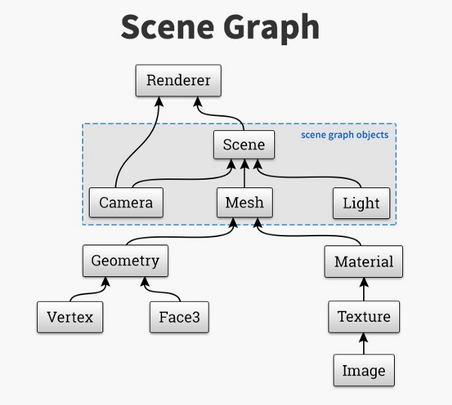
Three.js is a Javascript library developed by Ricardo Cabello (@mrdoob) in 2010 (today it has many contributors on Github). This incredible tool let us work with 3D graphics on the browser, using WebGL in a very simple and intuitive way.
The renderer is the place where the result of the scene will be visible. In Three.js we can have multiple scenes and each one can have different objects.
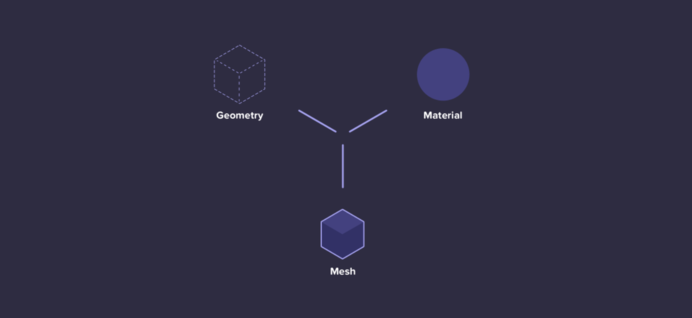
In Three.js a Mesh is the composition of a Geometry with a Material.
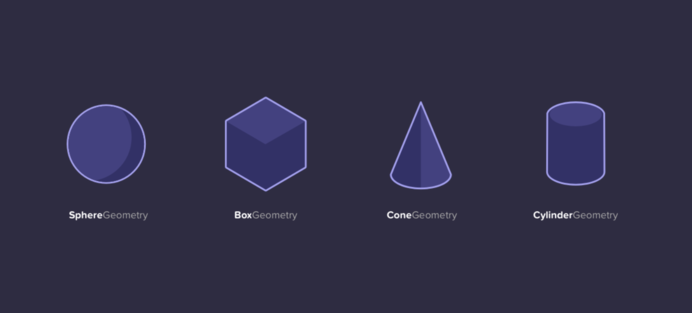
A Geometry is the mathematical formula of an object, in Three.js we have many geometries, we’ll explore it in future chapters. A Geometry give us the vertices of the object we want to add to the scene.
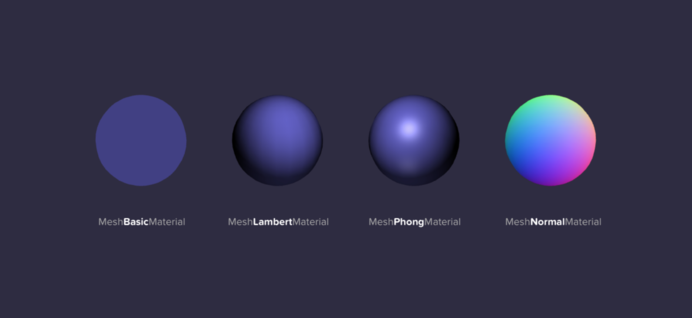
A Material can be defined as the properties of an object and its behavior with the light sources of the scene. As you can see in the following image there are different types of materials.
Console became my friend after time...Debugging, debugging, debugging...
<!DOCTYPE html>

<html>
<body>
	<script src="three.min.js"></script>
	<script src="TrackballControls.js"></script>

	<script>
		var camera, controls, scene, renderer;

		init();
		animate();

		function init(){

			camera = new THREE.PerspectiveCamera(45, window.innerWidth / window.innerHeight, 1, 1000);
			camera.position.z = 500;

			controls = new THREE.TrackballControls( camera );
			controls.addEventListener('change', render);

			scene = new THREE.Scene();

			var geometry = new THREE.CubeGeometry(100, 100, 100);

			var material = new THREE.MeshNormalMaterial();

			var mesh = new THREE.Mesh( geometry, material );
			scene.add(mesh);

			renderer = new THREE.WebGLRenderer();
			renderer.setSize(window.innerWidth,  window.innerHeight);

			document.body.appendChild(renderer.domElement);
		}

		function animate() {
			requestAnimationFrame( animate );
			controls.update();
		}

		function render(){

			renderer.render( scene, camera );

		}

	</script>

</body>
</html>

