Flipbooks: Difference between revisions
No edit summary |
No edit summary |
||
| Line 1: | Line 1: | ||
== Summary == | |||
This recipe will enable any aspiring experimental publisher to cook up some flipbooks out of short video sequences, using only a couple of command line tools. | This recipe will enable any aspiring experimental publisher to cook up some flipbooks out of short video sequences, using only a couple of command line tools. | ||
== Flipbook 101 == | == Flipbook 101 == | ||
<div style="float:right;"> | |||
<gallery mode="nolines" widths=180px heights=400px> | |||
File:Linnet kineograph 1886.jpg | |||
</gallery> | |||
</div> | |||
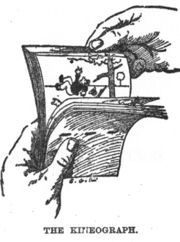
A flipbook is a book with a series of pictures that vary gradually from one page to the next. When the pages are turned rapidly, it simulates an animation | |||
== Recipe == | == Recipe == | ||
To start off, you'll need to install a couple of tools: | To start off, you'll need to install a couple of tools: | ||
<code> | <code> | ||
$ sudo apt-get install imagemagick ffmpeg | $ sudo apt-get install imagemagick ffmpeg | ||
</code> | </code> | ||
Enter the folder your video is located in, then run the following commands: | Enter the folder your video is located in, then run the following commands: | ||
* to generate frames from the video, give the desired frame rate (-r 30) and format the output files (frames%09d.jpg); | * to generate frames from the video, give the desired frame rate (-r 30) and format the output files (frames%09d.jpg); | ||
<code> | <code> | ||
ffmpeg -i video_name -r 30 frames%09d.jpg | ffmpeg -i video_name -r 30 frames%09d.jpg | ||
</code> | </code> | ||
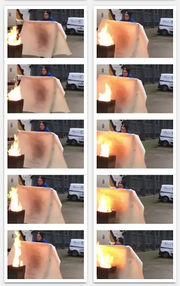
* in order to save some paper when printing the flipbook, you'll want to generate jpgs that include several frames in one image, in order. You can give the desired size of the frames and the spacing between them ('640X640>+10+10), as well as the number of frames per page (-tile 1X3); | * in order to save some paper when printing the flipbook, you'll want to generate jpgs that include several frames in one image, in order. You can give the desired size of the frames and the spacing between them ('640X640>+10+10), as well as the number of frames per page (-tile 1X3); | ||
<code> | <code> | ||
montage -geometry '640x640>+10+10' -tile 1x3 /*.jpg test%04d.jpg | montage -geometry '640x640>+10+10' -tile 1x3 /*.jpg test%04d.jpg | ||
</code> | </code> | ||
* to generate one pdf that includes all and only the newly generated jpgs; | * to generate one pdf that includes all and only the newly generated jpgs; | ||
<code> | <code> | ||
convert test*.jpg test.pdf | convert test*.jpg test.pdf | ||
</code> | </code> | ||
<div style="float:right;"> | |||
<gallery mode="nolines" widths=180px heights=400px> | |||
File:Crop.jpg | |||
</gallery> | |||
</div> | |||
* alternatively, you can simply move the jpgs generated in the second step into a new folder, enter that folder and run the convert command there. | * alternatively, you can simply move the jpgs generated in the second step into a new folder, enter that folder and run the convert command there. | ||
Revision as of 11:28, 8 December 2017
Summary
This recipe will enable any aspiring experimental publisher to cook up some flipbooks out of short video sequences, using only a couple of command line tools.
Flipbook 101
A flipbook is a book with a series of pictures that vary gradually from one page to the next. When the pages are turned rapidly, it simulates an animation
Recipe
To start off, you'll need to install a couple of tools:
$ sudo apt-get install imagemagick ffmpeg
Enter the folder your video is located in, then run the following commands:
- to generate frames from the video, give the desired frame rate (-r 30) and format the output files (frames%09d.jpg);
ffmpeg -i video_name -r 30 frames%09d.jpg
- in order to save some paper when printing the flipbook, you'll want to generate jpgs that include several frames in one image, in order. You can give the desired size of the frames and the spacing between them ('640X640>+10+10), as well as the number of frames per page (-tile 1X3);
montage -geometry '640x640>+10+10' -tile 1x3 /*.jpg test%04d.jpg
- to generate one pdf that includes all and only the newly generated jpgs;
convert test*.jpg test.pdf
- alternatively, you can simply move the jpgs generated in the second step into a new folder, enter that folder and run the convert command there.


