
Mia/THE FOCAL CAMERA
First, come up with something or have a look into other practices
I'd like to make ...

With my focal camera I would partly like to explore the relations photography-drawing (presupposed objectivity/subjectivity of the image) and photography-text (how one influences another and how meaning of an element depends on its surrounding meanings).
I would like my camera to produce images that are in fact photographs, merged with text or drawings directly in the making of a negative (not later in the development/enraging processes). Some sort of collage that happens already on the film in the camera. I wish to achieve the results that are rather unpredictable (that I cannot entirely know beforehand how will the image and text overlap etc.), in a way also playful (inspiration in DADA collages and cut out poems, surrealist game ‘Exquisite corpse drinks the new wine’ etc.).
The best way I can think of to build this kind of camera would be changeable masks and/or filters. Those I imagine as removable ‘cassettes’. If possible, the camera would work with no mask inserted as well. So I wish to build a ‘normal’ camera that has an option to insert various masks (stencils) and filters with drawings/text that would then become part of the image. The idea is also to build a camera that can always be customised, depending on user’s goals.
If we manage to achieve that, it will already be beyond my expectations. In case we can make it even more complicated, I would like to see the object I photograph (as on a display or a viewfinder) and the drawing surface simultaneously and be able to draw directly on the visible image of the object. But this may be a step to think about next time, as an advanced version of the previous one. I don’t expect to realize this part if too complicated.
I imagine masks as wooden frames with plastic foil or thin plastic plates (would glass be better?) that I could draw on for instance with a permanent marker. That would enable me to draw on the site, insert the mask and take photos. So also drawings could be prepared beforehand or right at the spot. The whole set would consist of the camera and removable masks: (3 frames for instance) + plastic (or other) pieces to draw on. Then I could play with different pens as well. I remember few examples of the principle, but with the difference in the position of the mask (there it is placed in front of the lens or instead of the lens, while I wish to have the cassette behind the lenses, probably right in front of the film)... But the principle of inserted part is similar.
The process of making
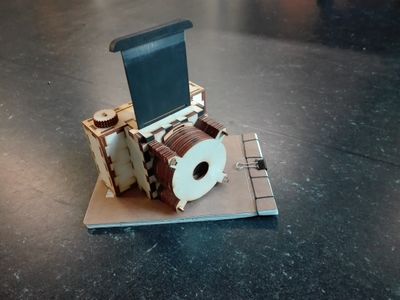
According to the plan, Mathijs (the tutor of the workshop) suggested building a camera with the thin slits in the top and bottom of the camera back, right at the depth of the film. To make the drawn / written image appear sharp on the film, it needs to be in direct contact with it. The most tricky part of that is keeping the camera light-tight while inserting something so close to the film. So we chose to use the system, where I would insert a long strip of thin plastic foil in the strip and also glue some additional leather and rubber protection to avoid light coming in the camera through the gap where the foil enters it. This would allow me to draw on the plastic sheet and simply pull it down to place it in front of the film. Moreover, it was practical to experiment on the spot and draw on the sheet beforehand, and change it per-picture.
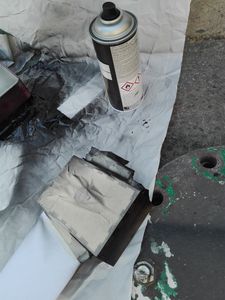
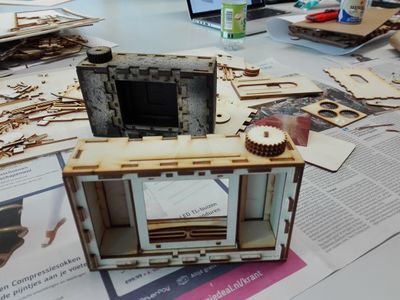
Making and building included laser cutting the pieces, gluing them together, spray painting the interior of the camera black (to prevent light bouncing around), testing to get the right focal distance and finally bringing all the pieces together. The next stage was to make the camera light tight - filling the gaps either with the mixture of acrylic and glue or taping the seams from the outside to prevent light leaks.
- The process of making


Final stages?


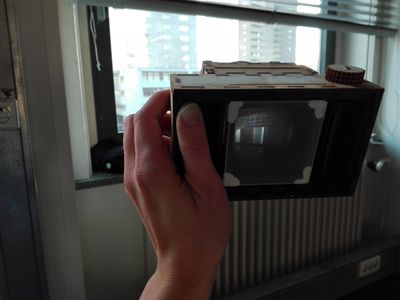
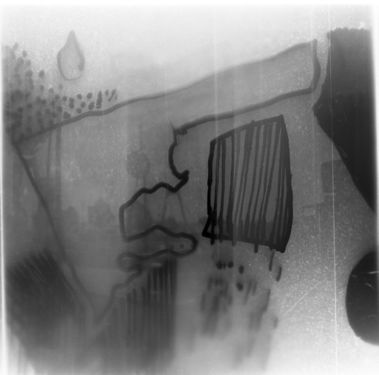
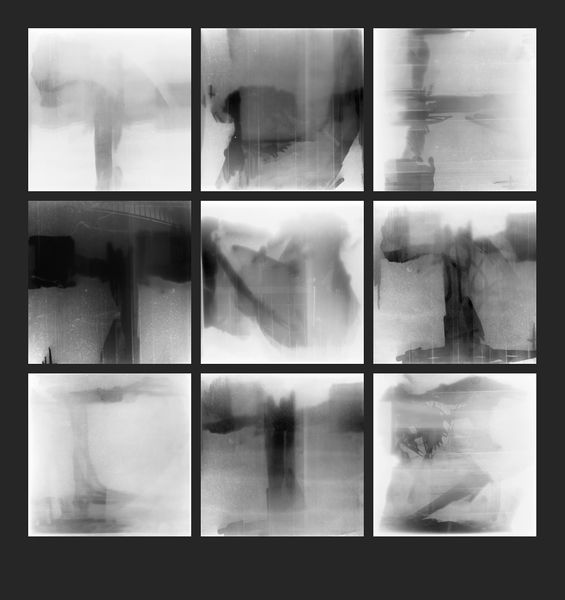
After making the camera light tight I took 12 pictures and developed them (medium format BW film). The film turned out very dark to almost black, meaning that my camera had still some light leaks. Even though all the negatives were way overexposed, the scanner managed to give me some images by calculating the average exposure and adjusting the parameters so I got echoed images in grey tones with the writing/drawing more visible than the background photo. But I decided to continue with fixing the camera and making it completely light tight by adding another piece of wood to the back part and applying some additional tape on the seams in front and the sides of the shutter. For testing, I put few pieces of photographic paper in the camera (of course in the darkroom), closed it and left it on my desk for a day.
- Pictures from the first roll of film:
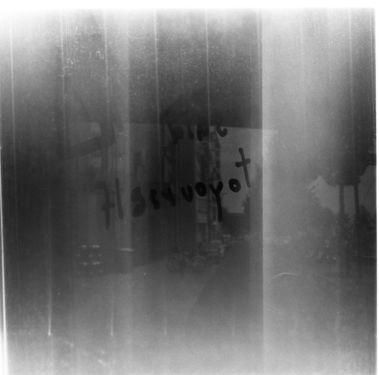
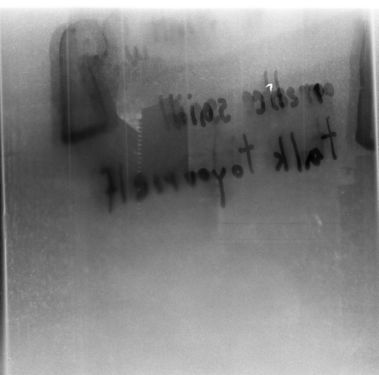
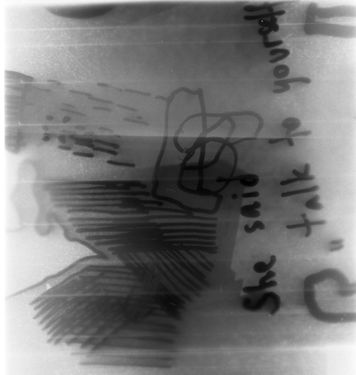


The paper test showed that light was still coming in but I could not identify where exactly. After several adjustments and tests with film and paper, I decided to tape my whole camera regardless of my aspirations of primary wooden design ... I also had to tape the back after loading the film and I added longer leather flaps to cover the plastic strip because it behaved as a light conductor. After this, results were slightly better, yet still not what I was aiming for. DIY camera turned out to be very unpractical in cold and windy weather because the plastic strips were fluttering too much and were in the way of the shutter plus flaps kept opening letting additional light to enter the camera. Regarding the conditions I decided to take next step in the studio with lighting, position of the model and the camera being controlled more easily. It was also a good opportunity to change the subject from outdoors environment (architecture, street etc.) to portrait and figure in interior space. I also loaded the film in the darkroom and moreover tried to wrap my camera in cloth to keep it in shade for the time the film was inside.
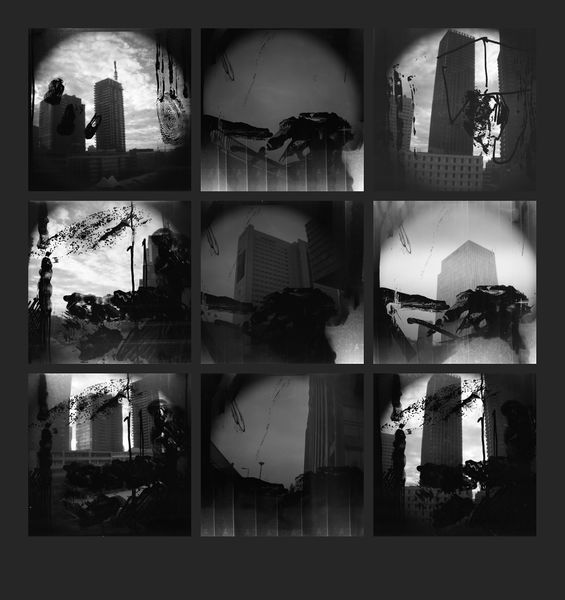
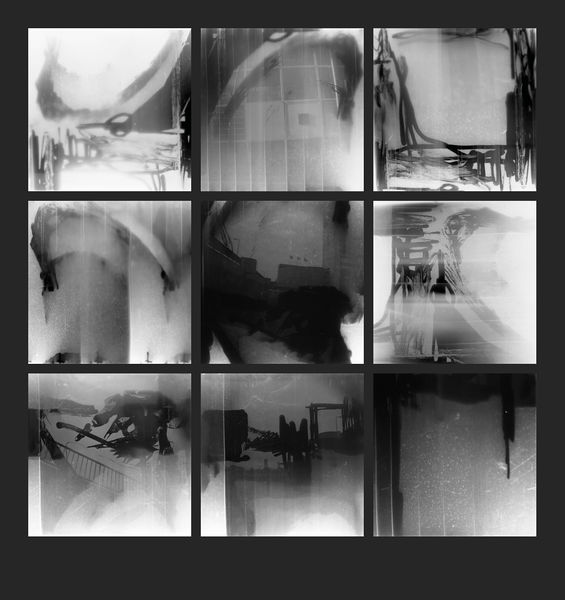
Pictures from next 4 rolls of film


Well then - how to use the camera as an interesting tool?
I thought working with this camera could be easier in the studio (wind, rain, cold and low light in winter time are a bit annoying, making the flaps flutter and light coming in). I tried out the portraits/figures - I asked one of my classmates to be a model and I tried to draw his portrait on the plastic and then took pictures. I expected a strange overlapping of a drawing and a photograph of the same person, that could speak about interpretation or the feeling about the person. However, the studio lighting turned out to be insufficient since the film came out almost transparent. Next step is an AV studio with very strong lighting. I actually wasn't aware that even on a cloudy day, the light outside is just way stronger than in the photo studio with all lights on. This was also good thing to learn since in general I rarely take pictures indoors so it was a good experience.
What to do with all the failed photographs?
Google doesn't say much, I'll have to come up with something on my own...
I am selecting and categorizing the pictures and wish to make one or few contact sheets with multiple photographs arranged in a geometric net, forming a square composition of let's say 36 pictures. Having them all together, I can put them in three (or more) categories, ranging from very abstract to fairly sharp with clear representation.
Other option could also be a photobook with few chapters/parts.
- Big Plates


(Review of the workshop)
I find the workshop very useful: it gave me a good insight in how the camera works but also what can go wrong! Making a camera myself encouraged me to also think about how my older praktica could be repaired (since the shutter won't open). Before this experience I would just give up, buy another one or take it to the professional to repair it. Now I think it might be a minor problem that I could solve myself, which is a nice feeling.
Since I continued solving the problems (mainly light leaks) of my DIY camera after the workshop and the whole process required a lot of testing, failing and nerves, I am trying to have a different perspective on failure as well. The results I got might not be what I was aiming for, but could still be useful source material for something else. The images I got were not sharp and properly exposed, but I might use them for some other purposes anyway (see below).
Miscellaneous
Useful pages and slideshow: Links by Mathijs
Interesting DIY tricks for equipment